
You spot a thin crack running across the wall and the first thought is usually the worst one: is something wrong with my house? Most of the time, a hairline crack in drywall is cosmetic — the result of normal settling, seasonal movement, or a drywall seam that was never taped perfectly. And most of the time, it’s a genuinely fixable DIY repair.
But “most of the time” isn’t “always.” The smart move is to spend two minutes diagnosing the crack before you patch it — because the right repair depends on what kind of crack you’re looking at, and a few crack patterns deserve investigation rather than another coat of compound. This guide walks through both.
Quick Answer
Most thin, stable hairline cracks in drywall are cosmetic and DIY-repairable: clean out loose material, fill with joint compound (adding paper tape if the crack is on a seam, around 1/8 inch wide, or keeps returning), feather thin coats, let each dry fully, sand smooth, prime, and paint. The important exception: cracks that are widening, recurring after multiple repairs, diagonal around doors or windows, paired with sticking doors or staining, or in a sagging ceiling should be investigated before you patch them again.
Before You Patch It: What Kind of Crack Is This?
Not every line on a wall is the same problem, and each one wants a different fix. Figure out which one you have:
- Paint-only crack: a fine, shallow line that doesn’t go deeper than the paint — often in a spiderweb or alligator pattern. The drywall underneath is intact. Usually just needs sanding, priming, and repainting.
- True hairline drywall crack: a thin, straight-ish line in the drywall surface itself, typically less than 1/16 inch wide. The classic cosmetic crack — this guide’s main repair.
- Seam/joint crack: a straight line running exactly where two drywall sheets meet (often with a slight ridge or a visible tape edge). This is a tape-and-compound joint that has split — it needs tape to stay fixed, not just filler.
- Nail/screw pop: not a crack at all — a round bump pushing through the paint. Different defect, different fix: see our nail pop repair guide.
- Corner crack: a vertical line where two walls meet (an inside corner). Corners move more than flat walls, so these often need a flexible approach and tend to return — tape helps, but expect maintenance.
- Ceiling crack: needs extra caution (see Wall vs. Ceiling Cracks below). A straight crack along the wall/ceiling junction is often seasonal and cosmetic; a sagging or widening ceiling crack is not a DIY patch job.
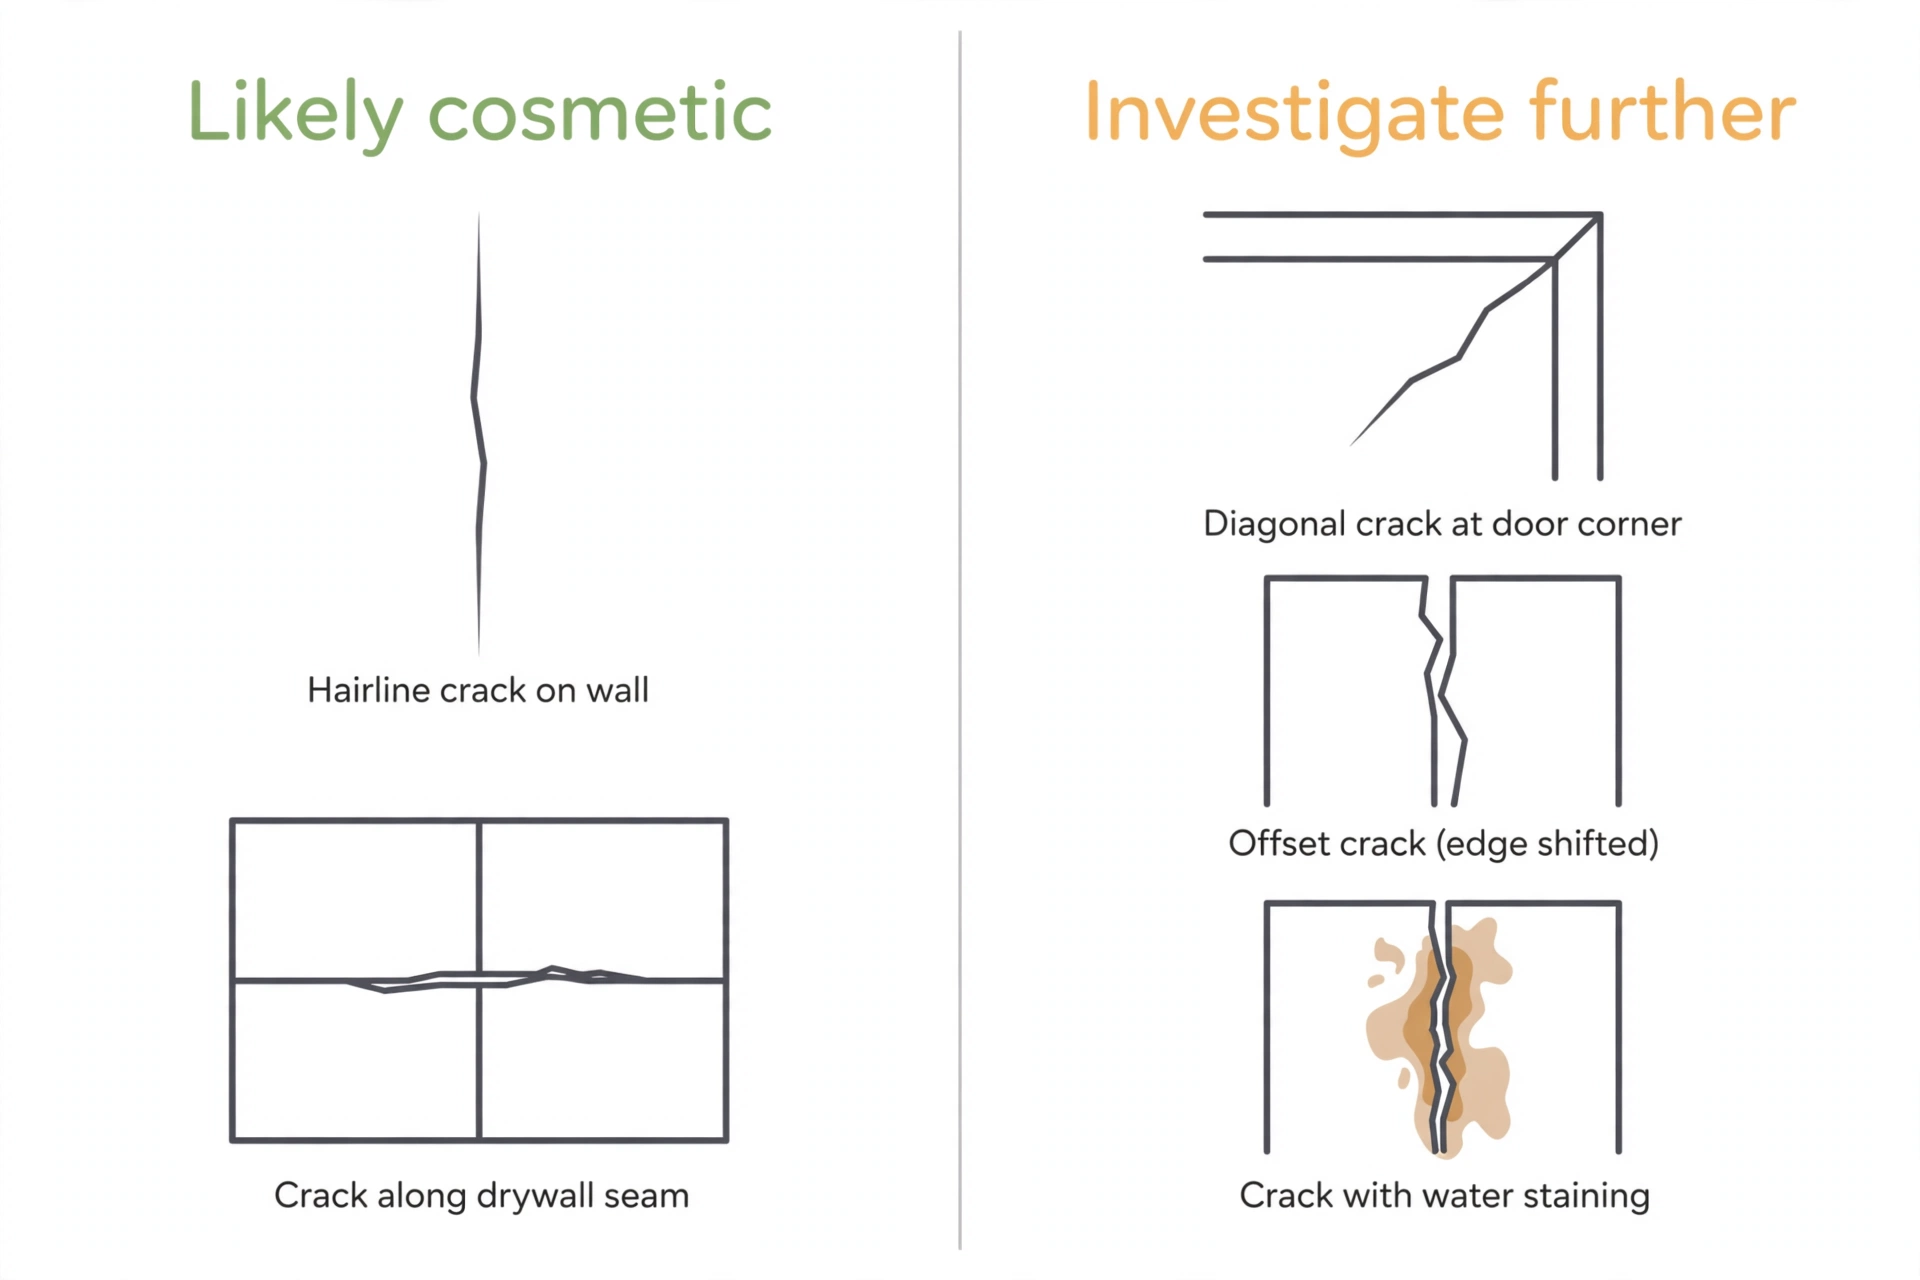
Quick decision guide
| What you see | Likely situation | DIY repair? | Typical approach |
|---|---|---|---|
| Thin (< 1/16″), short, stable crack on a flat wall | Cosmetic surface crack | Yes | Fill, feather, sand, prime, paint |
| Straight crack exactly along a drywall seam | Split taped joint | Yes | Compound + paper tape, feathered wide |
| Crack ~1/8″ wide, or one you’ve patched before | Stressed or recurring crack | Yes, once | Fill + tape; if it returns again, investigate |
| Diagonal crack from a door or window corner | Possible settlement movement | Watch first | Monitor for widening; don’t just patch repeatedly |
| Crack + brown/yellow staining | Moisture behind the wall | No — fix the source first | Find and fix the leak, then repair |
| Crack + sticking doors/windows, or visibly widening | Possible structural movement | No — get an opinion | Professional assessment before cosmetic repair |
| Sagging ceiling with cracking | Possible attachment failure | No | Professional assessment — don’t patch overhead sagging |
A note on the 1/8-inch threshold: it’s a rule of thumb, not a law. USG’s own gypsum repair guidance treats cracks around 1/8 inch as the point where tape becomes necessary rather than optional — below that, filler alone often suffices for a stable crack.
What You’ll Need
- Utility knife — for cleaning out loose material
- 6-inch taping knife — for filling and feathering
- Joint compound — all-purpose ready-mixed works; setting-type (“hot mud”) is USG’s recommended pick for crack repairs because it shrinks less and cures fast
- Paper joint tape — for seam cracks, wider cracks, or recurring ones
- Sanding sponge (medium/fine) and a dust mask
- Primer and touch-up paint matched to your wall
Not sure whether to buy spackle or joint compound for this? Our spackle vs joint compound comparison breaks down which product fits which repair. (Short version: for a true hairline, either works; for anything needing tape or feathering, joint compound is the right call.)
Building your first toolkit? Our essential DIY tools guide covers the knives, sanding sponges, and basics worth owning.
How to Fix a Cosmetic Hairline Crack
This is the method for a crack your decision table put in the “DIY repair” column: thin, stable, no warning signs.
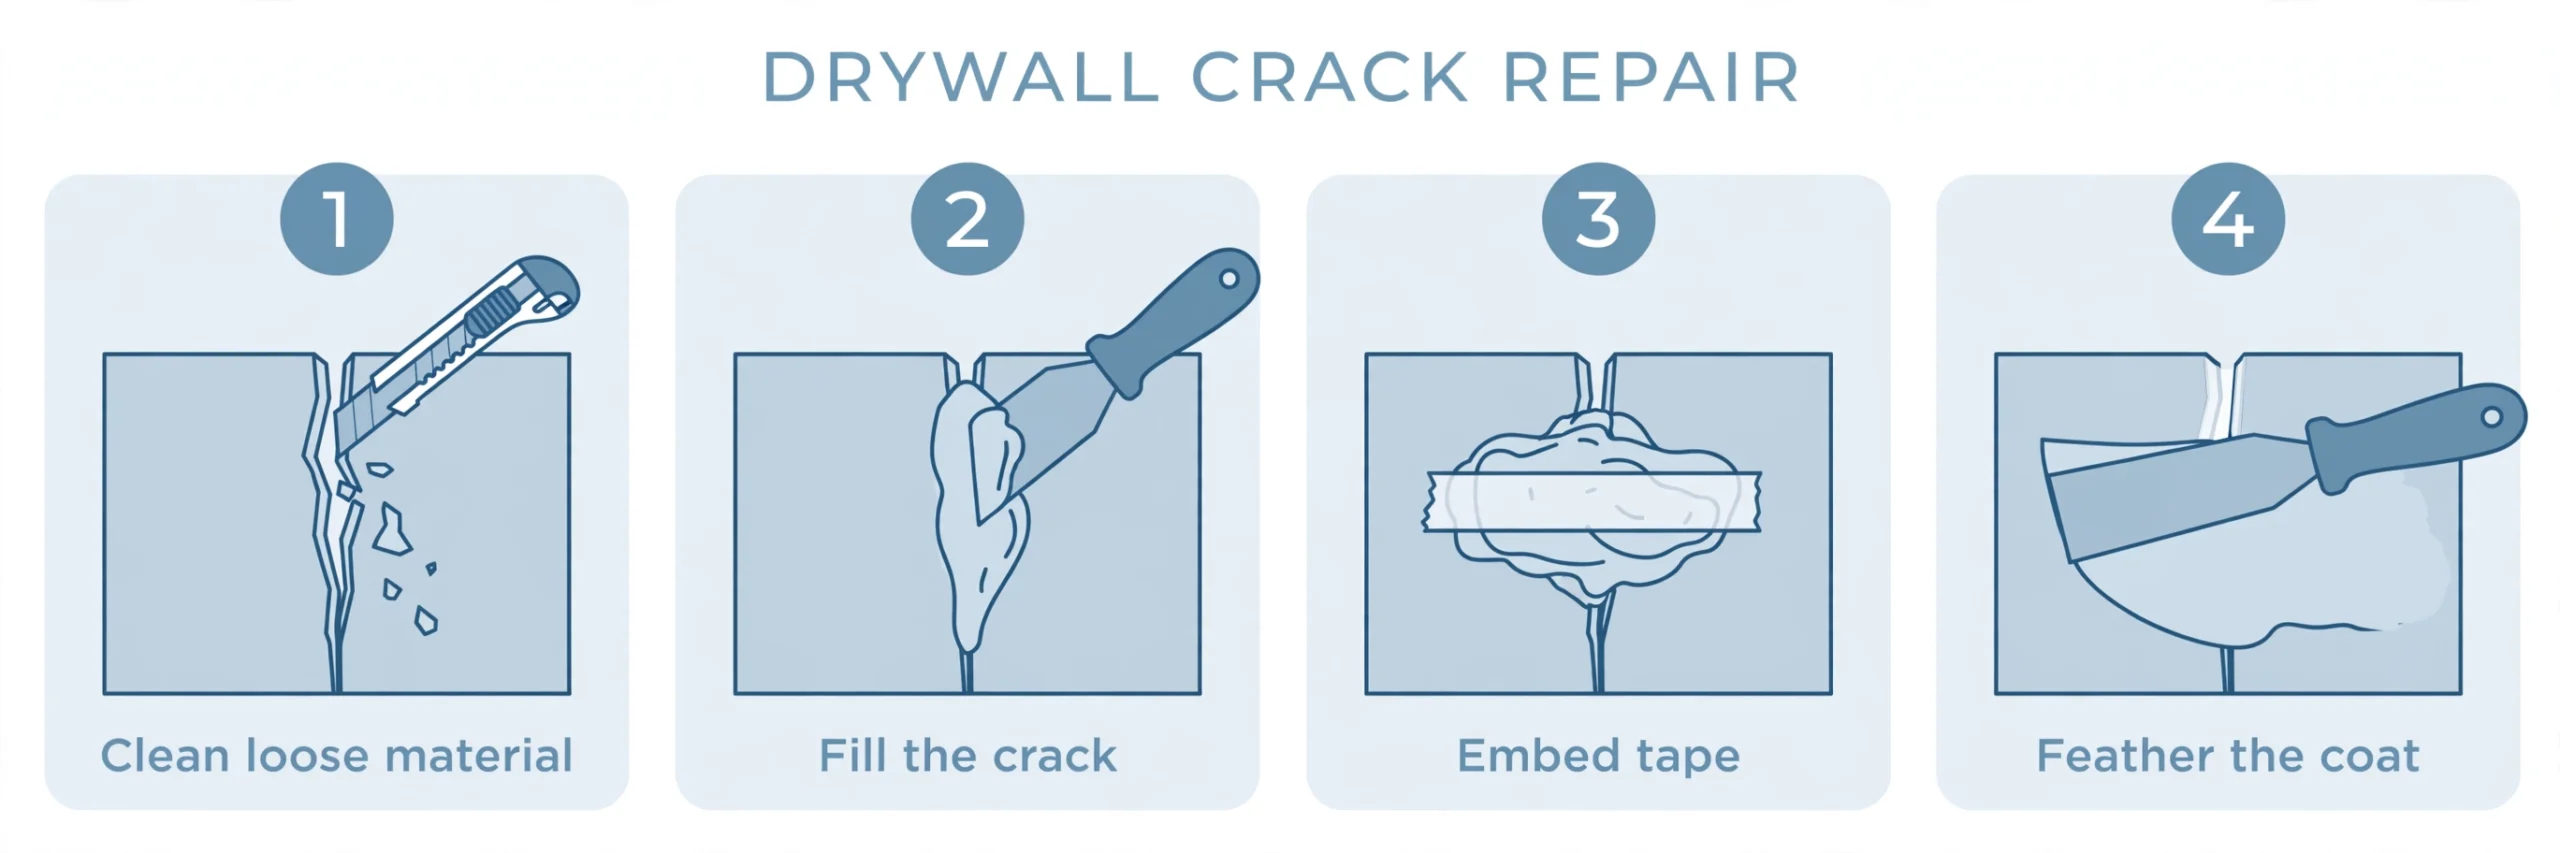
Step 1: Confirm It’s Cosmetic
Re-check the decision table above. Measure the crack’s width — a credit card is about 1/32 inch thick, a useful reference. If it’s hairline, stable (not visibly growing), and none of the warning signs apply, proceed. If anything in the right-hand column matches, stop here and investigate first.
Step 2: Prep the Crack
Scrape away any loose paint, crumbling compound, or flaking paper along the crack with your utility knife. You’re giving the filler something solid to grip — compound bonds poorly to loose material, and this is one of the quiet reasons repairs fail. If the paint is peeling off the wall in sheets around the crack rather than just a few loose flakes, that’s an adhesion problem — see our guide to fixing peeling paint.
For a seam crack or one you can fit a knife tip into, you can open it slightly into a shallow V shape. This isn’t mandatory for every hairline — a true < 1/16-inch stable crack often doesn’t need it — but a slight groove gives the compound more to hold onto where the crack has depth.
Step 3: Fill — and Tape Where It Counts
Press joint compound firmly into the crack with the taping knife, then scrape it as flush as you can. Now the key decision: does this crack need tape?
- No tape needed: a true hairline on a flat wall, first occurrence, not on a seam.
- Tape needed: the crack runs along a drywall seam, it’s around 1/8 inch wide, it’s long, or you’ve patched this exact crack before.
Tape is what keeps a crack from reopening — it bridges the two sides so seasonal movement doesn’t split the filler again. That’s the mechanism most quick tutorials skip: compound alone is rigid, and a rigid plug over a flexing joint eventually cracks along the same line.
Two tape options, and the pairing matters:
- Paper joint tape: bed it in a thin layer of wet compound, press it into the crack, then draw the knife firmly along it to squeeze out excess and embed it tight. This is USG’s recommended method for crack repair.
- Self-adhesive mesh tape: only pair it with setting-type compound, not regular premixed all-purpose. USG/CGC guidance is explicit here — mesh embedded in drying-type compound makes a weak bond. If you’re using ready-mixed compound, use paper tape.
Step 4: Feather Thin Coats
Apply a thin coat of compound over the repair, feathering the edges several inches out so there’s no hard ridge. Let it dry fully (compound turns uniformly light/white — but check the label, since products vary), then apply a second thin coat feathered slightly wider. Two thin coats beat one thick coat every time: thick coats crack and take far longer to dry.
Step 5: Sand Smooth
Dust mask on. Sand lightly with a sanding sponge until the repair feels flush with the surrounding wall — no ridge at the edges. Don’t over-sand; if you sand through to the tape, add another thin coat and try again once dry. Wipe away dust with a barely-damp cloth.
Step 6: Prime
Brush primer over the repaired area and let it dry. Dried compound is more porous than painted drywall, so paint applied directly over it can look dull or uneven — painters call this “flashing,” and it’s the reason many DIY patches stay visible even with matching paint.
Step 7: Paint
Touch up with matched paint in the same sheen as the wall. Feather the touch-up a few inches past the repair so the edge fades. For a long crack repair, repainting the wall corner to corner often gives a cleaner result than one long touch-up stripe.
Why Hairline Cracks Come Back
If you’ve patched the same crack twice and it’s back again, the filler isn’t the problem — the movement is. Understanding the mechanism saves you from an endless patch cycle:
- Seasonal movement: framing and drywall expand and contract with temperature and humidity swings. A rigid compound plug over a joint that flexes twice a year will eventually split along the same line. This is the most common cause of recurring hairline cracks.
- Framing shrinkage: in newer homes, lumber continues drying and shrinking for the first few years, stressing joints and seams.
- Poor original taping: a seam that was taped with too little compound under the tape, or never properly embedded, is a crack waiting to happen. Your repair with proper tape embedment is often better than the original.
- Surface-only repair over a seam problem: smearing compound over a split taped joint without re-taping just hides the split temporarily. The joint is still split underneath.
- Moisture: recurring dampness softens compound and paper tape. If the area feels damp or shows staining, the moisture source has to be fixed first — no filler survives that.
The stop rule: if you’ve properly repaired the same crack (with tape) two or three times and it keeps returning, stop patching and investigate. Repeated cosmetic repair over an active movement or moisture problem is just hiding it. That’s the point where a home inspector’s opinion is worth more than another tub of compound.
Wall vs. Ceiling Cracks
Ceiling cracks deserve their own caution, because what’s above them matters:
- Straight crack along the wall/ceiling junction that opens in winter and closes in summer is often truss uplift — the roof trusses lift slightly in cold weather, pulling the ceiling drywall at the edges. Inspectors see this constantly; it’s seasonal and cosmetic, not structural. It still needs tape to stay patched, and it may need seasonal touch-ups.
- Straight cracks across a ceiling away from the junction can mean the drywall tape has separated (often from moisture or poor original application) — repairable, but check for dampness first.
- Stop DIY when: the ceiling is sagging or bowed along with the crack, the crack is visibly widening, or there’s staining. Sagging ceiling drywall is heavy and can fall — that’s professional territory, not a patch job.
Priming and Texture: The Honest Finish
Two things separate an invisible repair from one you notice every time you walk past:
Priming isn’t optional. As noted in Step 6, unprimed compound flashes through paint as a dull spot. This is the same mechanism behind every patch-visibility complaint — one coat of primer over the repair before painting solves it.
Texture matching is genuinely the hardest part of the job. Patching a crack on a flat wall is straightforward; making that patch disappear on an orange-peel or knockdown wall takes practice. After sanding but before priming, you can approximate light texture by dabbing thinned compound with a sponge (practice on cardboard first), or use a texture spray can. Aim for “close enough” — paint hides more than you’d expect, and perfect texture matching is a pro skill while good-enough is a DIY one.
Frequently Asked Questions
Can I just paint over a hairline crack?
Paint alone won’t fix it — it’s too thin to bridge even a hairline, and the crack will telegraph right back through. At minimum, the crack needs filler; on a seam or a recurring crack, it needs tape too. Paint is the last step, not the repair.
Should I use spackle or joint compound for a hairline crack?
For a true hairline on a flat wall, either works — spackle is faster for tiny fills. But the moment the repair needs tape or feathering over a longer crack, joint compound is the right call: it spreads thinner and blends better. Our spackle vs joint compound comparison covers the full decision.
Do I need tape to fix a drywall crack?
Not always. A first-time true hairline on a flat wall usually doesn’t need it. You need tape when the crack runs along a drywall seam, is around 1/8 inch wide, is long, or has come back after a previous repair. Tape is what bridges movement — it’s the difference between a repair that lasts and one that reopens.
Why does the same crack keep coming back?
Because the underlying movement never stopped — usually seasonal expansion and contraction flexing a joint, or a seam that was poorly taped originally. Compound alone is rigid; without tape bridging the joint, the filler splits along the same line. If a properly taped repair fails two or three times, stop patching and investigate the cause.
Do hairline cracks mean foundation problems?
Usually not. Isolated thin cracks are most often normal settling, seasonal movement, or shrinkage — especially in newer homes. They become worth a professional look when they’re diagonal around doors or windows, visibly widening, recurring despite proper repair, paired with sticking doors or windows, or accompanied by staining or sagging. A crack’s appearance alone doesn’t prove foundation damage.
Are ceiling cracks different from wall cracks?
Somewhat. A straight crack where the wall meets the ceiling is often truss uplift — seasonal, cosmetic, and common. But ceiling cracks with sagging, widening, or staining need professional assessment before any patching, since you’re dealing with gravity and potentially compromised attachment.

Mohammed Algaari is the founder and editor of DIYMendly, a practical home-repair resource focused on making common DIY problems easier to understand and solve. He oversees the site’s content strategy and editorial direction, with an emphasis on clear, well-researched, step-by-step guidance based on reliable sources.
Pingback: Spackle vs Joint Compound: When to Use Each
Pingback: How to Fix Peeling Paint on Interior Walls (DIY Repair Guide)