
A garbage disposal that has truly died — no sound at all, a cracked housing, or leaks from the unit itself — usually isn’t worth repairing. The good news: swapping in a new unit is a very doable DIY job. You’re mostly disconnecting and reconnecting things that are already there, and most replacements take 1–2 hours with basic hand tools.
This guide is for you if your disposal is dead, leaking from the body, or so old that repairs no longer make sense. If your disposal hums but doesn’t grind, you probably don’t need a replacement — see our garbage disposal humming troubleshooting guide first.
Quick answer: To replace a garbage disposal, turn off the circuit breaker and verify the power is dead. Disconnect the dishwasher drain hose and the drain pipes. Support the unit and twist it off its mounting assembly. Install the new mounting flange with plumber’s putty, hang the new unit, reconnect the wiring (or plug it in), reattach the drain and dishwasher hose — knocking out the dishwasher drain plug first if you have a dishwasher — then restore power and test for leaks. Most replacements take 1–2 hours.
⏱ 1–2 hours · 💲 Cost of the unit + $10–20 in supplies (typical range — prices vary) · 🛠 Beginner–Intermediate
Safety first: This job involves household electricity, so take it seriously. Turn off the circuit breaker for the disposal — not just the wall switch — and verify the power is off with a non-contact voltage tester before touching any wiring. Never put your hands inside a disposal, even a disconnected one; use tongs or pliers. The unit is heavy and awkward to hold overhead — support it from below and get a helper if you need one. Wear safety glasses and gloves. Know where your home’s main water shut-off is. If you’re not comfortable with any of the wiring, stop and call a licensed electrician. There’s no shame in it — a pro can handle the electrical while you do the rest.
Step 0: Match the New Unit Before You Buy
Buying the right replacement avoids most mid-job surprises:
- Same brand often fits the existing mount. Many disposals from the same manufacturer share a mounting assembly design, so the new unit may twist right onto the old mount. Check the manufacturer’s instructions to confirm — when in doubt, plan to install the new mounting assembly that comes in the box.
- Match the power connection. Disposals are either plug-in (a cord that plugs into an outlet under the sink) or hardwired (connected directly to household wiring). Buy the same type you have. Switching types means adding an outlet or a cord kit, which is electrician territory if you’re unsure.
- Horsepower is flexible. 1/2 HP suits most households; higher horsepower handles tougher loads but the units are bigger and heavier. Going up modestly is fine as long as it fits your cabinet.
- Check the fit. Measure the space under your sink and compare it with the new unit’s dimensions — bigger motors need more room.
What you’ll need:
- New garbage disposal (matched to your setup — see above)
- Plumber’s putty (for the sink flange seal)
- Non-contact voltage tester (to confirm the power is truly off)
- Flathead and Phillips screwdrivers
- Adjustable wrench or channel-lock pliers
- Bucket and old towels
- Hammer (for the dishwasher knockout plug, if needed)
- Flashlight or headlamp
- Wire nuts (usually included with the new unit if it’s hardwired — check the box)
- Phone camera — photograph the wiring and plumbing before you disconnect anything
Stocking your first toolkit? Our essential DIY tools guide has the full list.
Step 1: Cut the Power at the Breaker and Verify It’s Dead
- Flip the wall switch off, then go to your breaker panel and turn off the breaker for the disposal. If you’re not sure which breaker it is, turn off the kitchen circuit breakers until the disposal’s switch does nothing.
- Go back under the sink and test with a non-contact voltage tester near the disposal’s wiring or outlet. No beep, no light = safe to proceed.
- Tape a note on the breaker panel (“DO NOT TURN ON — disposal work in progress”) so nobody flips it back while you’re under the sink.
Step 2: Disconnect the Dishwasher Drain Hose (If You Have One)
- Find the rubber hose running from your dishwasher into the side of the disposal.
- Loosen the hose clamp with a screwdriver and wiggle the hose off the disposal’s inlet nipple. A little water may drip out — that’s normal.
- Tuck the hose up and out of the way so it doesn’t snag later.
Step 3: Disconnect the Drain Pipes
- Put the bucket under the disposal — water trapped in the drain pipes will spill.
- Loosen the slip nut connecting the disposal’s discharge tube to the drain pipe (or P-trap) and pull the tube free.
- Lay towels in the cabinet to catch drips.
Step 4: Remove the Old Unit from Its Mounting Assembly
- Support the unit’s weight from below with one hand — it’s heavier than it looks and will drop once freed.
- Find the mounting ring where the disposal meets the sink flange. On most units, you twist the unit counterclockwise (viewed from below) about a quarter turn to release it — some have a mounting ring with screws to loosen. Check your old unit’s design before forcing anything.
- Lower the old unit out of the cabinet and set it in the bucket or on towels — it’s grimy.
Step 5: Remove the Old Mounting Assembly (If You’re Replacing It)
Skip this if the new unit fits the existing mount (see Step 0).
- From under the sink, loosen the mounting screws on the old assembly.
- From above the sink, lift out the old sink flange. Scrape off all the old plumber’s putty from the sink opening with a plastic scraper — the new flange needs a clean surface to seal.
Step 6: Install the New Mounting Assembly

- Roll a rope of plumber’s putty about the thickness of a pencil and press it around the underside of the new sink flange.
- From above, press the flange firmly into the sink drain opening. The putty will squeeze out — that’s what you want.
- From below, slide on the mounting hardware in the order shown in the manufacturer’s instructions (usually a gasket, mounting ring, and snap ring), then tighten the mounting screws evenly. Wipe away the squeezed-out putty from above.
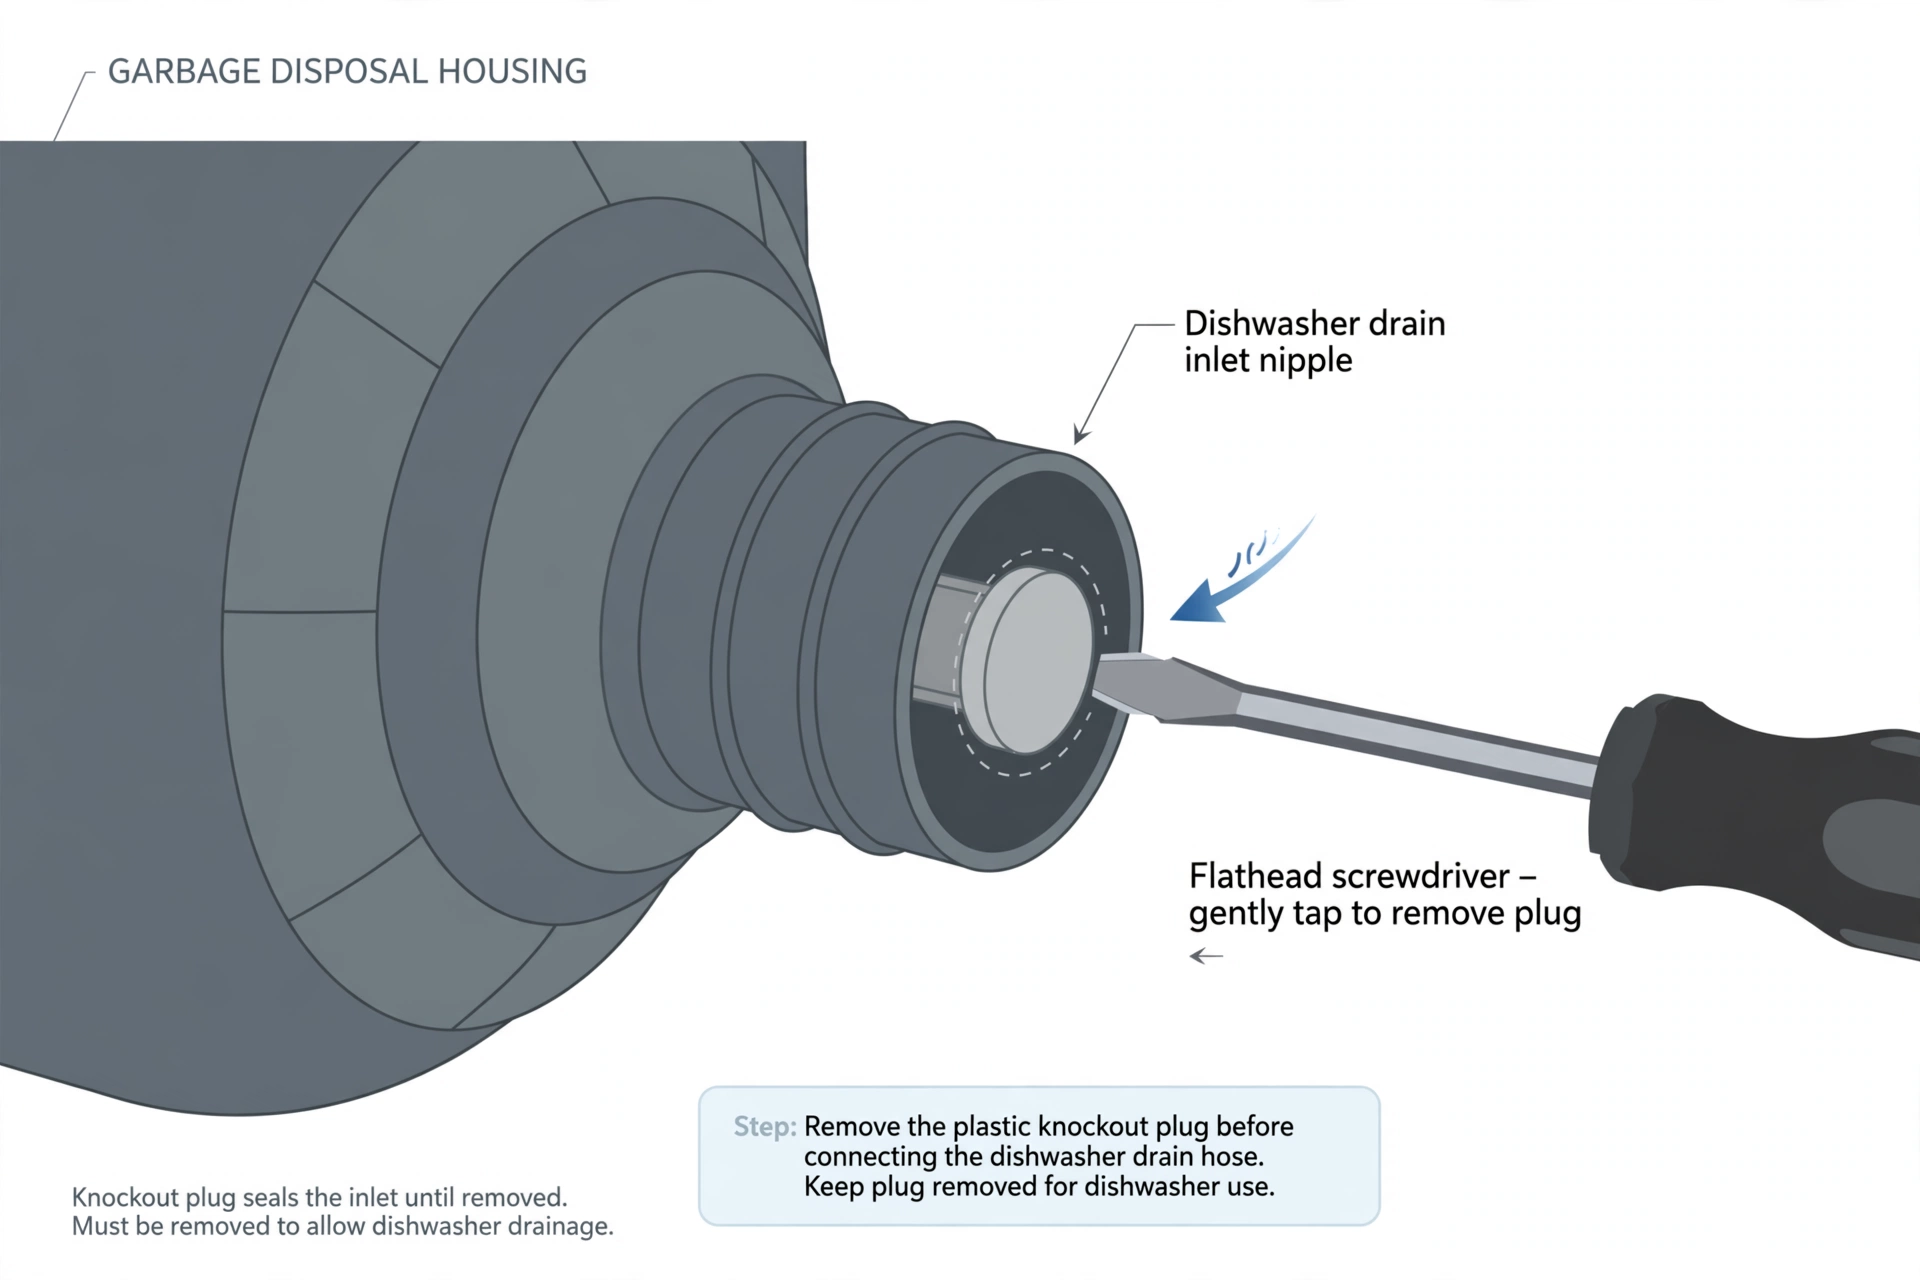
- Knock out the dishwasher drain plug now (before hanging the unit): if you have a dishwasher, look inside the dishwasher inlet nipple on the new disposal — you’ll see a plastic plug. Put a screwdriver against it and give it a firm tap with the hammer, then reach in and pull the plug piece out. If you don’t have a dishwasher, leave the plug in place.
Step 7: Hang the New Unit
- Lift the new disposal up to the mounting assembly, align it, and twist clockwise until it locks into place. It should feel solid with no wobble.
- Rotate the unit so the discharge tube points toward your drain pipe and the dishwasher inlet faces the dishwasher hose.
Step 8: Connect the Electrical
Plug-in models: Simply plug the cord into the under-sink outlet. Done.
Hardwired models:
- Remove the wiring cover plate on the bottom or side of the disposal.
- Feed the house wiring through the cable clamp and tighten the clamp so the cable can’t pull out.
- Connect matching wires with wire nuts: black to black, white to white, and the ground wire (green or bare copper) to the unit’s ground screw. Tug each wire nut gently to confirm it’s secure.
- Tuck the wires in neatly and reinstall the cover plate.
If anything about the wiring looks different from this — damaged wires, no ground wire, a scorched outlet box, or you’re simply unsure — stop and call a licensed electrician. Wiring mistakes are not the place to guess.
Step 9: Reconnect the Drain and Dishwasher Hose
- Reattach the discharge tube between the disposal and the drain pipe, tightening the slip nuts snugly. If the new unit sits at a different height, you may need to adjust the trap alignment — hand-tighten first, then snug with pliers. Don’t overtighten plastic nuts.
- Push the dishwasher drain hose back onto the inlet nipple and tighten the clamp.
Step 10: Test for Leaks, Then Test the Grind
- Remove the breaker-panel note and turn the breaker back on.
- Run cold water into the sink and watch every connection — flange, discharge tube, dishwasher hose — for drips. Let it run a full minute.
- Flip the wall switch on with water running. It should start smoothly with no rattling.
- Drop in a few ice cubes and run them through — this is a gentle first test that also helps clean the grind chamber.
If you spot a drip, turn everything off and snug the fitting a quarter turn. Persistent leaks at the sink flange mean the putty seal needs redoing (Step 6).
When to Call a Pro
- You’re not comfortable with the wiring, or the wiring doesn’t match what this guide describes.
- The outlet box is damaged, scorched, or has no ground wire.
- Drain pipes don’t line up and would need cutting or reconfiguration — that’s plumber work.
- Water leaks from the sink flange after two attempts at the putty seal.
- You smell burning or see sparking at any point — stop immediately and call an electrician.
For broader plumbing judgment calls, our DIY plumbing repairs guide covers what’s realistically DIY and what isn’t.
Frequently Asked Questions
How long do garbage disposals last?
Service life varies by model, use, and maintenance. Check the manufacturer’s guidance and assess recurring faults or leaks before deciding whether to repair or replace. Hard water, heavy use, and frequent jams shorten that. If yours is past that range and acting up, replacement is usually the better investment than another repair.
Can I replace my disposal with a different brand or horsepower?
Yes. Horsepower just needs to fit your cabinet and your needs — 1/2 HP is plenty for most households. Different brands almost always require installing the new mounting assembly that comes in the box, since mounts aren’t interchangeable across brands.
What if the new unit doesn’t fit the old mounting assembly?
Install the mounting assembly that came with the new unit (Steps 5–6). It takes an extra 15 minutes and guarantees a proper fit and seal. Same-brand replacements are the most likely to fit an existing mount — check the manufacturer’s instructions to confirm.
Do I really need plumber’s putty?
Yes — it’s the standard seal between the sink flange and the sink itself, and it stays flexible so the seal survives vibration. Don’t skip it or substitute caulk unless the manufacturer specifically says otherwise.
Why is my brand-new disposal humming?
A hum with no grinding usually means the flywheel is jammed or the reset button tripped during installation. Press the reset button on the bottom of the unit, then check for a jam with tongs (never your hand). Full diagnosis: https://diymendly.com/garbage-disposal-humming/
What’s the dishwasher knockout plug?
New disposals ship with the dishwasher drain inlet sealed by a small plastic plug. If you have a dishwasher, you must knock it out during installation (Step 6) or the dishwasher can’t drain. If you don’t have a dishwasher, leave it in — it keeps the inlet sealed.

Mohammed Algaari is the founder and editor of DIYMendly, a practical home-repair resource focused on making common DIY problems easier to understand and solve. He oversees the site’s content strategy and editorial direction, with an emphasis on clear, well-researched, step-by-step guidance based on reliable sources.