
Those small, round bumps pushing through your wall paint — often with a little ring of cracked paint around them — are called nail pops. They look alarming, but they’re one of the most common cosmetic drywall issues in a home, and fixing them is a genuinely beginner-friendly job that takes about an afternoon for a whole room.
Here’s the key insight most people miss: don’t just hammer the nail back in. It can pop right back out, often within months. The lasting fix is to secure the d
then skim the spot smooth with joint compound. This guide walks you through the whole thing.
Quick Answer
To fix a nail pop, drive a drywall screw 1–2 inches above and below the popped nail, sinking each screw just enough to dimple the paper without tearing it. Tap the old nail back flush (or pull it out), then cover everything with 2–3 thin coats of joint compound, letting each coat dry. Sand smooth, prime the patch, and touch up with paint. Properly repaired pops usually stay fixed.
Project at a Glance
- Difficulty: Beginner
- Time: About an afternoon for a whole room
- Cost: Usually under $20 — a small tub of joint compound, drywall screws, and sandpaper
- Painting: Yes — touch-up paint matched to your wall, applied over primer
Why Nail Pops Happen
Drywall is fastened to wooden wall studs. Over time, that wood can shrink slightly as it dries out, or shift a little as the house settles and goes through seasonal temperature and humidity changes. When the wood moves, it can push the nail head outward while the drywall panel stays put — and the nail head pushes a little bump through the paint.
Screws resist popping better than smooth-shank nails: their threads grip the wood, and less shrinkable wood sits between the fastener tip and the framing face. That’s why older, nail-fastened drywall pops far more often than screw-fastened drywall — and why the lasting repair uses screws, not another nail.
Pops are also more likely where fasteners were overdriven during installation (a screw that breaks the paper loses much of its holding power) or spaced too far apart to hold the panel tight.
This is most common in newer homes (the framing lumber is still drying out during the first few years), but it can happen in older homes too. A few isolated pops are normal and cosmetic. Widespread pops across many walls, pops paired with diagonal cracks, bowed drywall, or water staining are different — those can signal structural movement or moisture problems, and they deserve a professional’s eyes before you do cosmetic repairs (see “When to Investigate Further” below).
Nail Pops vs. Screw Pops
Most pops in older homes are nails; in newer homes, the culprit is sometimes a screw. It matters which one you’re dealing with.
- If it’s a nail: don’t rely on hammering it back — re-fasten the panel with screws above and below, as this guide describes.
- If it’s a screw: try tightening it first. If it bites and seats into a shallow dimple, compound over it and you’re done. If it spins freely without gripping, the hole is stripped — drive a new drywall screw an inch or two away into solid wood, then back the old screw out (or recess it below the surface) and patch both spots.
What You’ll Need
- Drywall screws — 1-1/4″ coarse-thread screws are the usual choice for standard 1/2″ drywall; if your walls are thicker (5/8″), step up to 1-5/8″
- Drill or driver with a Phillips bit (a dimpler bit helps but isn’t required)
- Hammer (for tapping the old nail)
- 6″ putty knife or taping knife
- Ready-mixed all-purpose joint compound (a small tub covers many pops)
- Sanding sponge (medium/fine grit)
- Dust mask — wear it when sanding; joint compound dust is irritating to breathe
- Stain-blocking or drywall primer (a small can is plenty)
- Touch-up paint matched to your wall
- Utility knife or 5-in-1 tool — for scraping away loose paint and cracked compound
- Safety glasses — for ceiling repairs
Building your first toolkit? Our essential DIY tools guide covers the basics worth owning.
How to Fix Nail Pops in Drywall
Step 1: Confirm It’s a Nail Pop
Before you start, find every pop. They’re easiest to spot at night: hold a lamp close to the wall so light rakes across the surface — every bump casts a shadow. You can also run a putty knife lightly over the wall; a true pop catches the blade. Mark each one with a light pencil circle so you can work through them systematically.
Press the bump gently. A nail pop feels like a firm, round bump — usually about the size of a dime — often with cracked or flaking paint over it. You’ll typically find them in vertical or horizontal lines along the wall, which is where the studs are behind the drywall.
If the spot is soft, crumbly, or stained brown/yellow, that’s not a nail pop — it may be water damage, which needs the leak fixed first. If the drywall is bulging outward in a wide area rather than a small bump, that needs a closer look too.
Step 2: Secure the Drywall with Screws Above and Below
This is the actual fix — everything else is cosmetic.
- Position a drywall screw 1–2 inches above the popped nail, directly over the stud (the nail itself marks the stud’s location).
- Drive the screw in until the head sits about 1/32 inch below the paper surface — just enough to create a slight dimple. Do not tear the paper — a torn screw head has far less holding power. If you break through, back it out and drive a fresh screw an inch away.
- Repeat with a second screw 1–2 inches below the popped nail.
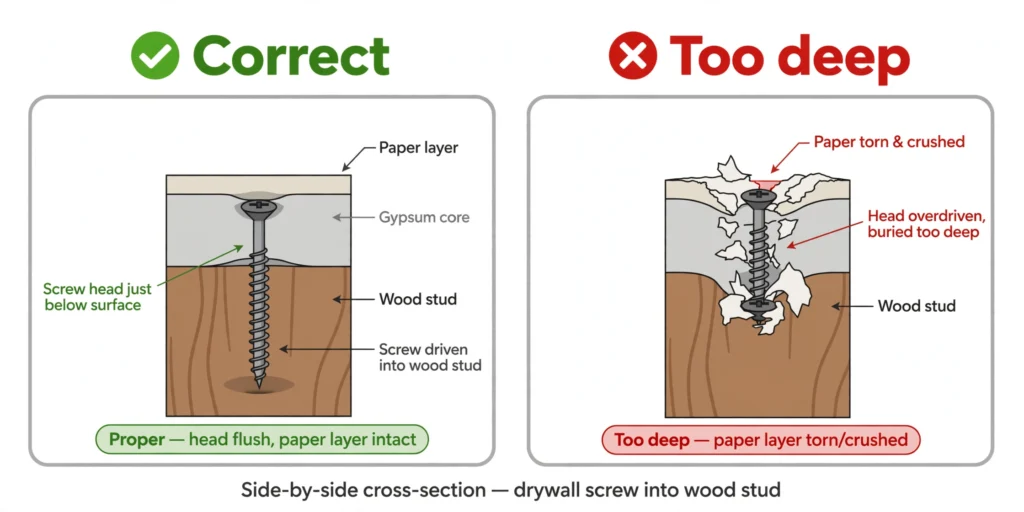
Tip: press the drywall panel firmly against the stud with your free hand while driving each screw — this closes any gap between the panel and the framing that caused the pop.
These two screws re-fasten the drywall panel firmly to the stud, which is what the loose nail can no longer do. This is why hammering the nail back in fails: the nail has already lost its grip on the wood, and nothing about hammering restores it.
Working on a ceiling? Wear safety glasses and work from a sturdy ladder. The two-screw method matters even more overhead, where gravity and seasonal movement of the framing work against a single fastener.
If you found several pops along one stud, mark them all first and work through them systematically — while the drill is out, consider adding a screw at nearby fastener spots that look stressed, before they pop too.

Step 3: Deal with the Old Nail
First, clean the site: scrape away any loose paint, cracked compound, or torn paper around the pop with a utility knife or 5-in-1 tool. Compound bonds poorly to loose material, and skipping this is one of the quiet reasons patches fail later.
You have two options, and both work:
- Tap it flush: Set the hammer face on the nail head and tap it gently until it sits just below the surface (a slight dimple, like the screws). Don’t whale on it — you just want it out of the way of the compound.
- Pull it out: If the nail is loose enough to grip with pliers, pull it out entirely. The two screws are now doing the fastening work.
Either way, the nail should end up slightly recessed or gone — never protruding.
Step 4: Apply Joint Compound in Thin Coats
- Scoop a small amount of joint compound onto your 6″ putty knife.
- Spread a thin coat over the screws and the old nail spot, feathering the edges out a few inches so there’s no hard ridge. Thin is the whole game here — thick coats crack as they dry and take forever.
- Let it dry completely (usually a few hours; the compound turns uniformly white/light when dry). Don’t rush this.
- Apply a second thin coat, feathering slightly wider than the first. Most pops need 2–3 coats to disappear completely — each one fills the dimples a little more.

If you’ve patched holes before, this is the same technique — our small drywall hole patching guide covers the feathering motion in more detail.
One caution for textured walls: if your wall has orange-peel or knockdown texture, a perfectly flat patch can stand out more than the original pop did. A light coat of texture spray matched to your wall — applied after sanding, before priming — helps the repair blend in.
Step 5: Sand Smooth
- Put on your dust mask.
- Lightly sand the dried compound with a sanding sponge, using gentle circular motions.
- Run your hand over the spot — you’re aiming for a surface that feels flush with the surrounding wall, with no ridge at the edges. Don’t over-sand; if you sand through to the paper or the screw heads, just add another thin coat of compound and try again once dry.
- Wipe away the dust with a barely-damp cloth or sponge.
Step 6: Prime the Patch
This step gets skipped a lot, and it’s the reason many DIY patches end up visible. Bare joint compound absorbs paint differently than the surrounding painted wall, so an unprimed patch will flash through as a dull spot even with matching paint. Brush one coat of primer over each patched area and let it dry.
Step 7: Paint to Match
Touch up with paint matched to your wall. If you don’t have the original paint, take a small paint chip (from behind a switch plate, for example) to a paint store for color matching. Use the same sheen as the existing wall — a flat touch-up on an eggshell wall will show.
For a single pop or two, a small brush and careful feathering is fine. If you repaired a dozen pops across one wall, repainting the whole wall often gives a cleaner result than a dozen touch-ups.
Why Nail Pops Come Back
A pop that’s been properly re-secured with screws and compounded usually stays fixed — the screws grip the stud far better than the original nail did. When a repaired pop does return, it’s almost always because the underlying movement was never addressed:
- Hammering the nail back in — the nail already lost its grip on the stud; hammering doesn’t restore it, so it works its way out again.
- Covering movement with compound — skimming over a loose panel without re-securing it just hides the problem temporarily.
- Screws driven too shallow or too deep — a proud screw head shows through the patch; an overdriven screw tears the paper and loses holding power.
- Rushing the coats — compounding over damp compound, or painting before it’s fully dry, leads to cracking and a visible patch.
- Skipping primer — the repair may look fine at first, then flash through as a dull spot once painted.
What’s normal, especially in a newer home, is for new pops to appear in other spots over the first few years as the framing continues to dry and the house settles. Treat those the same way when they show up. If you’re getting a large number of new pops year after year in an older home, that’s worth a professional assessment rather than endless patching.
How to Prevent Nail Pops
You can’t fully prevent nail pops in an existing home — some are just the house settling and lumber drying. But you can reduce how often they appear:
- Keep indoor humidity reasonably stable through the seasons. Big humidity swings make framing swell and shrink, which works fasteners loose over time.
- Use screws, not nails, for any new drywall work — with fasteners spaced closely enough that panels sit tight to the framing.
- Don’t overdrive fasteners. A screw that breaks the paper loses much of its holding power — set the head into a shallow dimple and stop.
- When you fix one pop, scan the whole room (see Step 1). Catching stressed fasteners early is the closest thing to prevention that exists for finished walls.
When to Investigate Further
Most nail pops are cosmetic. Use this quick triage to decide whether a repair is all you need — or whether the wall deserves a closer look first:
| What you see | What it usually means | What to do |
|---|---|---|
| A few isolated pops | Normal wood shrinkage and settling | Cosmetic repair (this guide) |
| Several pops along one stud or ceiling area | Panel working loose in one spot | Re-fasten the area, then repair |
| Pops across many walls or ceilings at once | Possible structural movement or moisture | Get a professional opinion before patching |
| Pops with diagonal cracks, sticking doors/windows, bowing, or staining | Possible structural or moisture problem | Get a professional opinion — don’t just patch |
A home inspector or a reputable drywall/structural contractor can tell you whether you’re looking at normal settling or something that needs real attention. Cosmetic fixes over an active structural or moisture problem are just hiding it.
Frequently Asked Questions
What causes nail pops in drywall?
Usually it’s the wooden framing behind the wall: lumber shrinks slightly as it dries (very common in the first years of a new home), and seasonal expansion and contraction plus normal house settling can shift the wood enough to push nail heads outward. The drywall panel stays in place; the nail moves. A few isolated pops are normal and cosmetic.
Can I just hammer the nail back in?
You can, but it won’t last. The nail popped because it lost its grip on the stud, and hammering doesn’t restore that grip — it typically works its way back out within months. The lasting fix is driving drywall screws above and below the pop to re-fasten the panel, then compounding over everything.
Should I use screws or nails to fix a nail pop?
Screws. Drywall screws grip the wood far better than smooth-shank nails and are much less likely to work loose over time — which is exactly why the original nail failed. This is also why most modern drywall installation uses screws rather than nails in the first place.
How many coats of joint compound do I need?
Plan on 2–3 thin coats, letting each dry fully between coats. The first coat fills the screw dimples, and each following coat (feathered a little wider) levels the patch flush with the wall. One thick coat is worse than three thin ones — it cracks and takes much longer to dry.
Do I need to repaint the whole wall?
Not necessarily. For one or two pops, a careful touch-up with matched paint (same color and sheen) usually blends fine — but only if you primed the patch first. If you fixed many pops across a wall, or the touch-ups are visible, repainting the full wall gives the most uniform result.
Are nail pops a sign of foundation problems?
Usually not. Isolated nail pops are most often just normal wood shrinkage and minor settling — especially in newer homes. They become a concern when they’re widespread, appear alongside diagonal cracks or sticking doors and windows, or show up with water staining. In those cases, get a professional assessment rather than just patching.
How do I fix nail pops in a ceiling?
The same way as walls, with two differences: wear safety glasses and work from a sturdy ladder, since you’ll be looking up while dust and debris fall. The two-screw re-fastening matters even more on ceilings, where gravity and seasonal movement of the framing work against a single fastener. Compound, sand, prime, and paint exactly as you would on a wall.
The popped fastener is a screw, not a nail — what do I do?
Try tightening it first. If the screw bites and seats into a shallow dimple, you’re done — compound over it. If it spins freely without gripping, the wood is stripped; drive a new drywall screw an inch or two away into solid framing, then back the old screw out (or recess it below the surface) and patch both spots.
Can I use spackle instead of joint compound for nail pops?
For a single small pop, spackle works — it dries fast with minimal shrinkage. But joint compound is the better choice when you’re feathering over screw dimples or fixing several pops, because it spreads thinner and blends into the wall more invisibly.
Are nail pops normal in a new house?
Yes — they’re most common in the first few years, while the framing lumber is still drying out and shrinking. A few isolated pops in a new home are normal and cosmetic. What’s worth a second look is a large number of new pops appearing year after year, or pops paired with cracks, sticking doors, or staining.

Mohammed Algaari is the founder and editor of DIYMendly, a practical home-repair resource focused on making common DIY problems easier to understand and solve. He oversees the site’s content strategy and editorial direction, with an emphasis on clear, well-researched, step-by-step guidance based on reliable sources.
Pingback: How to Patch a Small Hole in Drywall: Step-by-Step Guide
Pingback: Spackle vs Joint Compound: When to Use Each
Pingback: How to Fix Hairline Cracks in Drywall (DIY Repair Guide)