
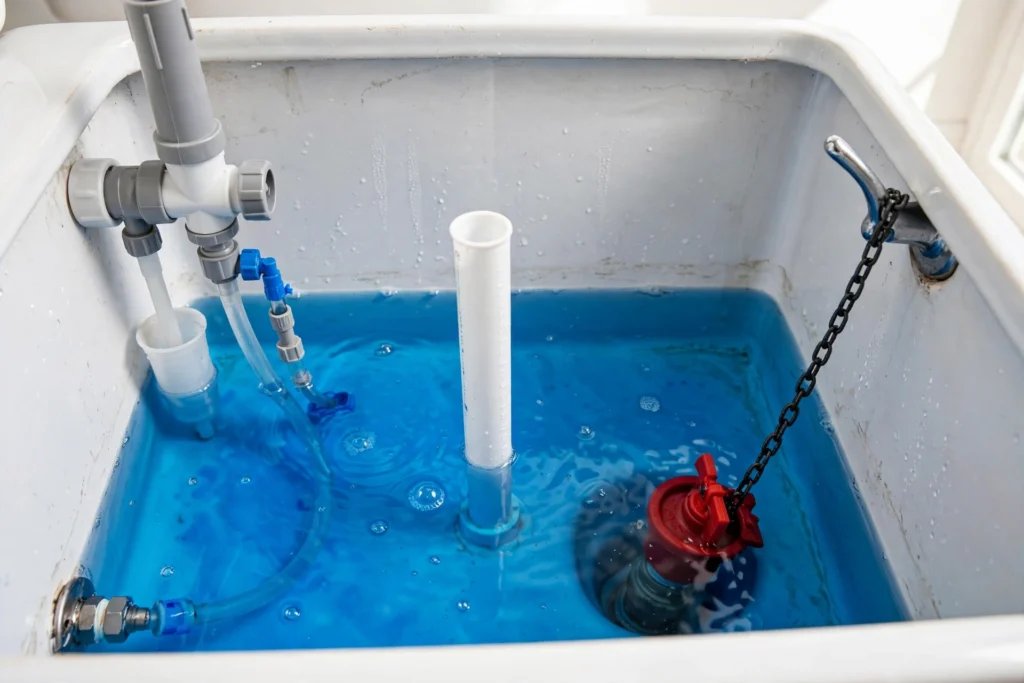
That faint hissing sound from the bathroom at 2 a.m.? That’s your toilet running — water flowing straight from the tank into the bowl, around the clock. A running toilet can waste up to 200 gallons of water a day (that’s the EPA’s widely cited estimate), which shows up on your water bill whether you hear it or not.
The good news: a running toilet is one of the simplest repairs in your entire home. There are only three parts that cause it — the flapper, the chain, and the fill valve — and all three are cheap, standardized, and designed to be replaced by hand. Most fixes take under 15 minutes and cost less than $15.
Safety first: This is a clean-water, fixture-level repair. You’ll shut off the toilet’s water supply before doing any part replacement. You won’t touch supply lines inside walls, the main water line, or anything gas-related. If water is leaking from the base of the toilet onto the floor, stop — that’s a different problem (a failed wax ring) and it belongs to a plumber.
What You’ll Need
- Replacement flapper ($5–10) — buy this only after diagnosing; match the size (2-inch is standard, some newer toilets use 3-inch)
- Food coloring or a dye tablet ($2–3, or free from the kitchen) — for the diagnostic test
- Adjustable wrench ($15–25, if you don’t own one yet) — only needed for fill valve replacement
- Sponge and small bucket or cup — for soaking up leftover tank water
- Old towel — tank lids are heavy ceramic and crack easily; set the lid on a towel, not tile
Total: $0–15 for the most common fixes. Compare that to a $150+ plumber visit.
How a Toilet Tank Works (60 Seconds)
Understanding the tank takes one minute and makes every step below obvious:
- You press the handle → a chain lifts the flapper (a rubber seal at the tank bottom).
- Tank water rushes into the bowl → the flush happens.
- The flapper drops back down and seals → the tank refills through the fill valve.
- A float rises with the water level and shuts the fill valve off at the right height.
A toilet “keeps running” when step 3 or 4 fails: either the flapper doesn’t seal (water leaks into the bowl continuously), or the fill valve never shuts off (water keeps flowing into the tank). Your job is to figure out which one.
Step 1: Diagnose It (The Dye Test)
⏱ 20 minutes (mostly waiting) · 💲 $0 · 🛠 Beginner
Before buying anything, confirm where the water is going:
- Take the tank lid off and set it on a towel somewhere safe.
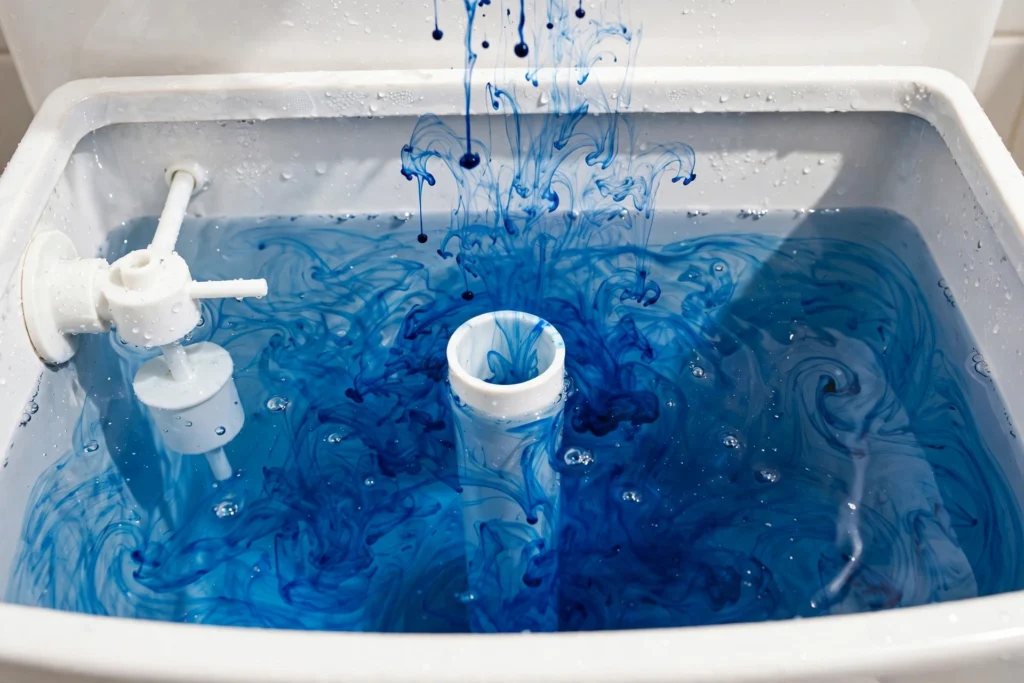
- Add several drops of dark food coloring (or a dye tablet) to the tank water. Don’t flush.
- Wait 15–20 minutes without using the toilet.
- Look in the bowl:
- Color in the bowl → the flapper is leaking. Water is slipping past the seal. Skip to Step 2.
- No color in the bowl, but the tank water level dropped → the flapper is leaking slowly, or water is escaping elsewhere. Still most likely the flapper — go to Step 2.
- No color in the bowl and the water level is steady, but you hear running → the fill valve isn’t shutting off. Go to Step 3.
Also glance at the overflow tube (the tall hollow pipe in the middle of the tank). If water is flowing down into it continuously, the water level is set too high — that’s a fill valve/float issue (Step 3).
Step 2: Fix the Flapper and Chain
The flapper is the #1 cause of running toilets. The rubber degrades over time — most flappers last 3–5 years — and then it can’t seal.
2a. Adjust the chain (free, 2 minutes)
⏱ 2 min · 💲 $0 · 🛠 Beginner
A chain that’s too tight holds the flapper slightly open; one that’s too loose tangles or slips under the flapper.
- Look at the chain connecting the flush handle arm to the flapper. It should have about half an inch of slack when the flapper is closed.
- If it’s taut, move the chain hook to a different link to add slack.
- If it’s tangled or has far too much slack, shorten it by re-hooking a few links up.
- Flush and listen. If the running stops, you’re done — this was a free fix.
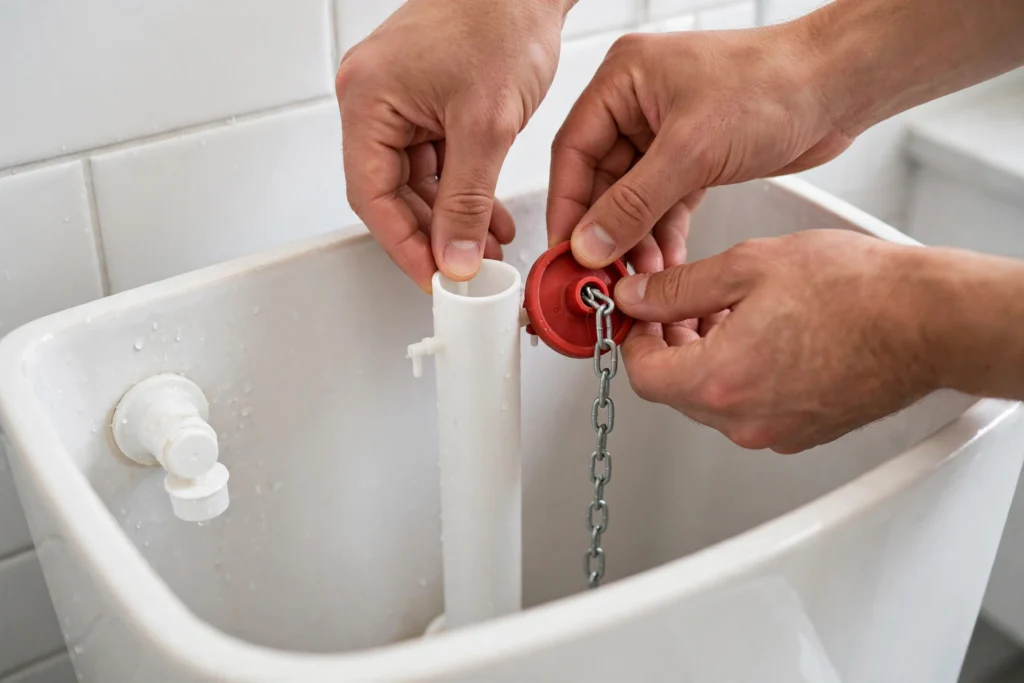
2b. Replace the flapper ($5–10, 15 minutes)
⏱ 15 min · 💲 $5–10 · 🛠 Beginner
If the chain is fine but the dye test showed a leak, the flapper itself is worn.
- Turn off the toilet’s shut-off valve — it’s on the wall or floor behind the toilet. Turn clockwise until it stops.
- Flush the toilet to empty the tank (hold the handle down to get as much water out as possible).
- Soak up the remaining inch of water with a sponge into your bucket.
- Unhook the chain from the flush arm.
- Slide the old flapper off the two pegs on the overflow tube (it usually just unclips).
- Take the old flapper to the hardware store and match it — size (2-inch vs. 3-inch) and style matter, and matching by sight beats guessing.
- Snap the new flapper onto the pegs, reconnect the chain with about half an inch of slack.
- Turn the shut-off valve back on (counterclockwise), let the tank fill, and flush to test.
Run the dye test again if you want to be thorough. No color in the bowl after 20 minutes means the seal is good.
Call a plumber if: the shut-off valve won’t turn or leaks when you touch it, or the flush valve seat (the ring the flapper sits on) is cracked or heavily corroded — that’s a bigger repair.
Step 3: Fix the Fill Valve
If the flapper seals fine but the tank keeps filling — water flowing into the overflow tube, or the valve hissing nonstop — the fill valve is the culprit.
3a. Adjust the water level (free, 5 minutes)
⏱ 5 min · 💲 $0 · 🛠 Beginner
The water level should sit about an inch below the top of the overflow tube. If it’s higher, water spills into the tube and the valve never rests.
- Find the float on the fill valve. On most modern valves it’s a cup that slides on the valve body, adjusted with a small clip or screw. On older ball-float valves, there’s a screw at the top of the float arm or you gently bend the arm down.
- Lower the float: squeeze the adjustment clip and slide the float cup down about an inch, or turn the adjustment screw, or bend the arm slightly downward.
- Flush and let the tank refill. Check the level — about an inch below the overflow tube top.
- If the running stops, done.
3b. Replace the fill valve ($10–15, 20–30 minutes)
⏱ 20–30 min · 💲 $10–15 · 🛠 Beginner
If adjusting doesn’t help — the valve keeps hissing, won’t shut off, or fills painfully slowly — replace it. Universal replacement fill valves fit nearly all toilets.
- Turn off the toilet’s shut-off valve and flush to empty the tank. Sponge out the remainder.
- Disconnect the water supply line from the bottom of the fill valve (under the tank) with your adjustable wrench. Have the bucket ready — some water will spill.
- Unscrew the plastic lock nut under the tank holding the old fill valve, and lift the old valve out.
- Set the new valve’s height per its instructions (it should stand about an inch below the overflow tube top when installed), drop it in, and tighten the lock nut by hand — then a quarter-turn with the wrench. Don’t overtighten plastic nuts.
- Reconnect the supply line and the refill tube (the small tube that clips to the overflow tube).
- Turn the water back on slowly, check for leaks at the connections, and adjust the float to set the water level.
Call a plumber if: the supply line connection is corroded and won’t budge, water sprays from anywhere you didn’t expect when you turn the supply back on, or the tank itself has a crack.
Step 4: The Final Check
After any fix, do this 2-minute verification:
- Flush and watch a full cycle. The tank should fill, the water should stop at the right level, and then — silence.
- Mark the water level inside the tank with a pencil. Check it an hour later. If it hasn’t dropped, nothing is leaking.
- Put the lid back on carefully.
A silent toilet is a fixed toilet.
When to Call a Plumber — No Exceptions for This Job
Most running toilets are DIY. Call a plumber when:
- Water leaks from the base of the toilet onto the floor. That’s a failed wax ring or a cracked base — a bigger job involving removing the toilet.
- The shut-off valve is frozen, broken, or leaks. No working shut-off means no safe DIY.
- You see a crack in the tank or bowl. Porcelain cracks don’t get better; the toilet needs replacing.
- Multiple fixtures have problems at once. One running toilet is a toilet problem. Several acting up together suggests a water pressure or supply issue.
FAQ
How much water does a running toilet actually waste?
It varies a lot with the severity of the leak, but the EPA’s widely cited estimate is that a constantly running toilet can waste up to 200 gallons per day — that’s roughly what an average household uses in total. Even a slow, silent leak adds up fast on your water bill, which is why the dye test is worth doing even if you only suspect a problem.
My toilet runs for a few seconds every few minutes, then stops. Is that the same problem?
Yes — that’s called “ghost flushing,” and it’s almost always a slow flapper leak. The tank drains just enough to trip the fill valve, which tops it off, and the cycle repeats. Replace the flapper (Step 2b).
Can I just jiggle the handle instead of fixing it?
Jiggling the handle reseats a flapper that’s being held open by a tangled chain — it’s a symptom reliever, not a fix. If jiggling works, adjust the chain properly (Step 2a) so you don’t have to do it every flush. If jiggling doesn’t work, the flapper is worn and needs replacing.
Do I need to turn off the water to adjust the chain or water level?
For adjustments (chain slack, float level), no — you’re not opening anything. For replacing the flapper or fill valve, yes — always shut off the toilet’s supply valve first and flush to empty the tank.
The fill valve I bought doesn’t look like my old one. Is that okay?
Probably. Most modern replacement fill valves are universal and look different from older ball-float designs. As long as it’s a standard toilet fill valve (not a pressure-assist or specialty commercial unit), it will fit. Follow the height-setting instructions in the package.
The Bottom Line
A running toilet is a $0–15, 15-minute fix in the vast majority of cases: adjust the chain, replace the flapper, or adjust the fill valve — in that order. The dye test tells you which one you need before you spend a dime.
If this got you curious about what else your plumbing can teach you, our DIY plumbing repairs guide covers dripping faucets, clogged drains, and garbage disposals with the same beginner-friendly approach. And for the full year-round picture, the new homeowner maintenance guide has the monthly and seasonal checklist that keeps small problems from becoming big ones.