
Every homeowner should know where their main water shutoff valve is before a pipe bursts at 2 a.m. This guide shows you how to find it, which type of valve you have, how to close it, and how to confirm the water is actually off — plus what to do when the valve won’t budge.
Water flowing right now? Start here — the 60-second emergency path:
1. Can one fixture valve stop it? If the leak is at a toilet, sink, or washing machine, look for a small shutoff valve right at that fixture (behind the toilet near the floor, or inside the sink cabinet). Turn it clockwise until it stops. Done — you don’t need the house main.
2. Otherwise, go to the house main. It’s usually where the water line enters your home — basement or crawlspace wall facing the street, garage, or utility room. In warmer climates it may be outside near the foundation or in a ground-level meter box.
3. Close it according to its type. Round wheel handle (gate valve): turn clockwise until it stops, gently. Lever handle (ball valve): swing the lever a quarter-turn so it sits perpendicular (across) the pipe.
4. Confirm it worked. Open the lowest faucet in the house. Flow should slow to a stop — that also relieves pressure in the pipes.
5. Stop and call for help if: the valve won’t turn with moderate hand pressure, it starts leaking when you touch it, water is near outlets or your electrical panel, or you can’t control the flooding. Call a plumber — or your water utility if the problem is at the meter.
Safety first: never force a seized valve (it can snap and make things worse), and never step into standing water near anything electrical.
Now the full guide, organized around the decisions you’ll actually face.
Fixture Valve or Whole-House Main?
Not every leak needs the main shutoff. Using the closest valve that isolates the problem is faster and less disruptive — the rest of the house keeps its water.
| Situation | Use this |
|---|---|
| Toilet overflowing or running nonstop | The toilet’s own supply valve (behind the bowl, near the floor) |
| Leak under a sink or a dripping faucet you’re about to fix | The hot/cold shutoff valves inside the sink cabinet |
| Washing machine hose leaking | The two valves on the wall behind the machine |
| Burst pipe in a wall, leak with no visible source, multiple fixtures affected | The whole-house main |
| You need to work on the main line itself, or you’re leaving for an extended trip | The whole-house main |
If a fixture valve exists and you can reach it safely, use it. Go to the main when the leak is upstream of any fixture valve, when you can’t find a fixture valve, or when the fixture valve itself is broken or stuck.
What the Two Main Valve Types Look Like
Almost every residential main shutoff is one of two designs. Identifying yours takes five seconds and determines exactly how you operate it.
Gate valve — round wheel handle. Common in older homes. It works like an outdoor hose spigot: turn the wheel clockwise to close, counterclockwise to open. Closing takes several full turns. Gate valves are the type most likely to seize up after years of sitting untouched.
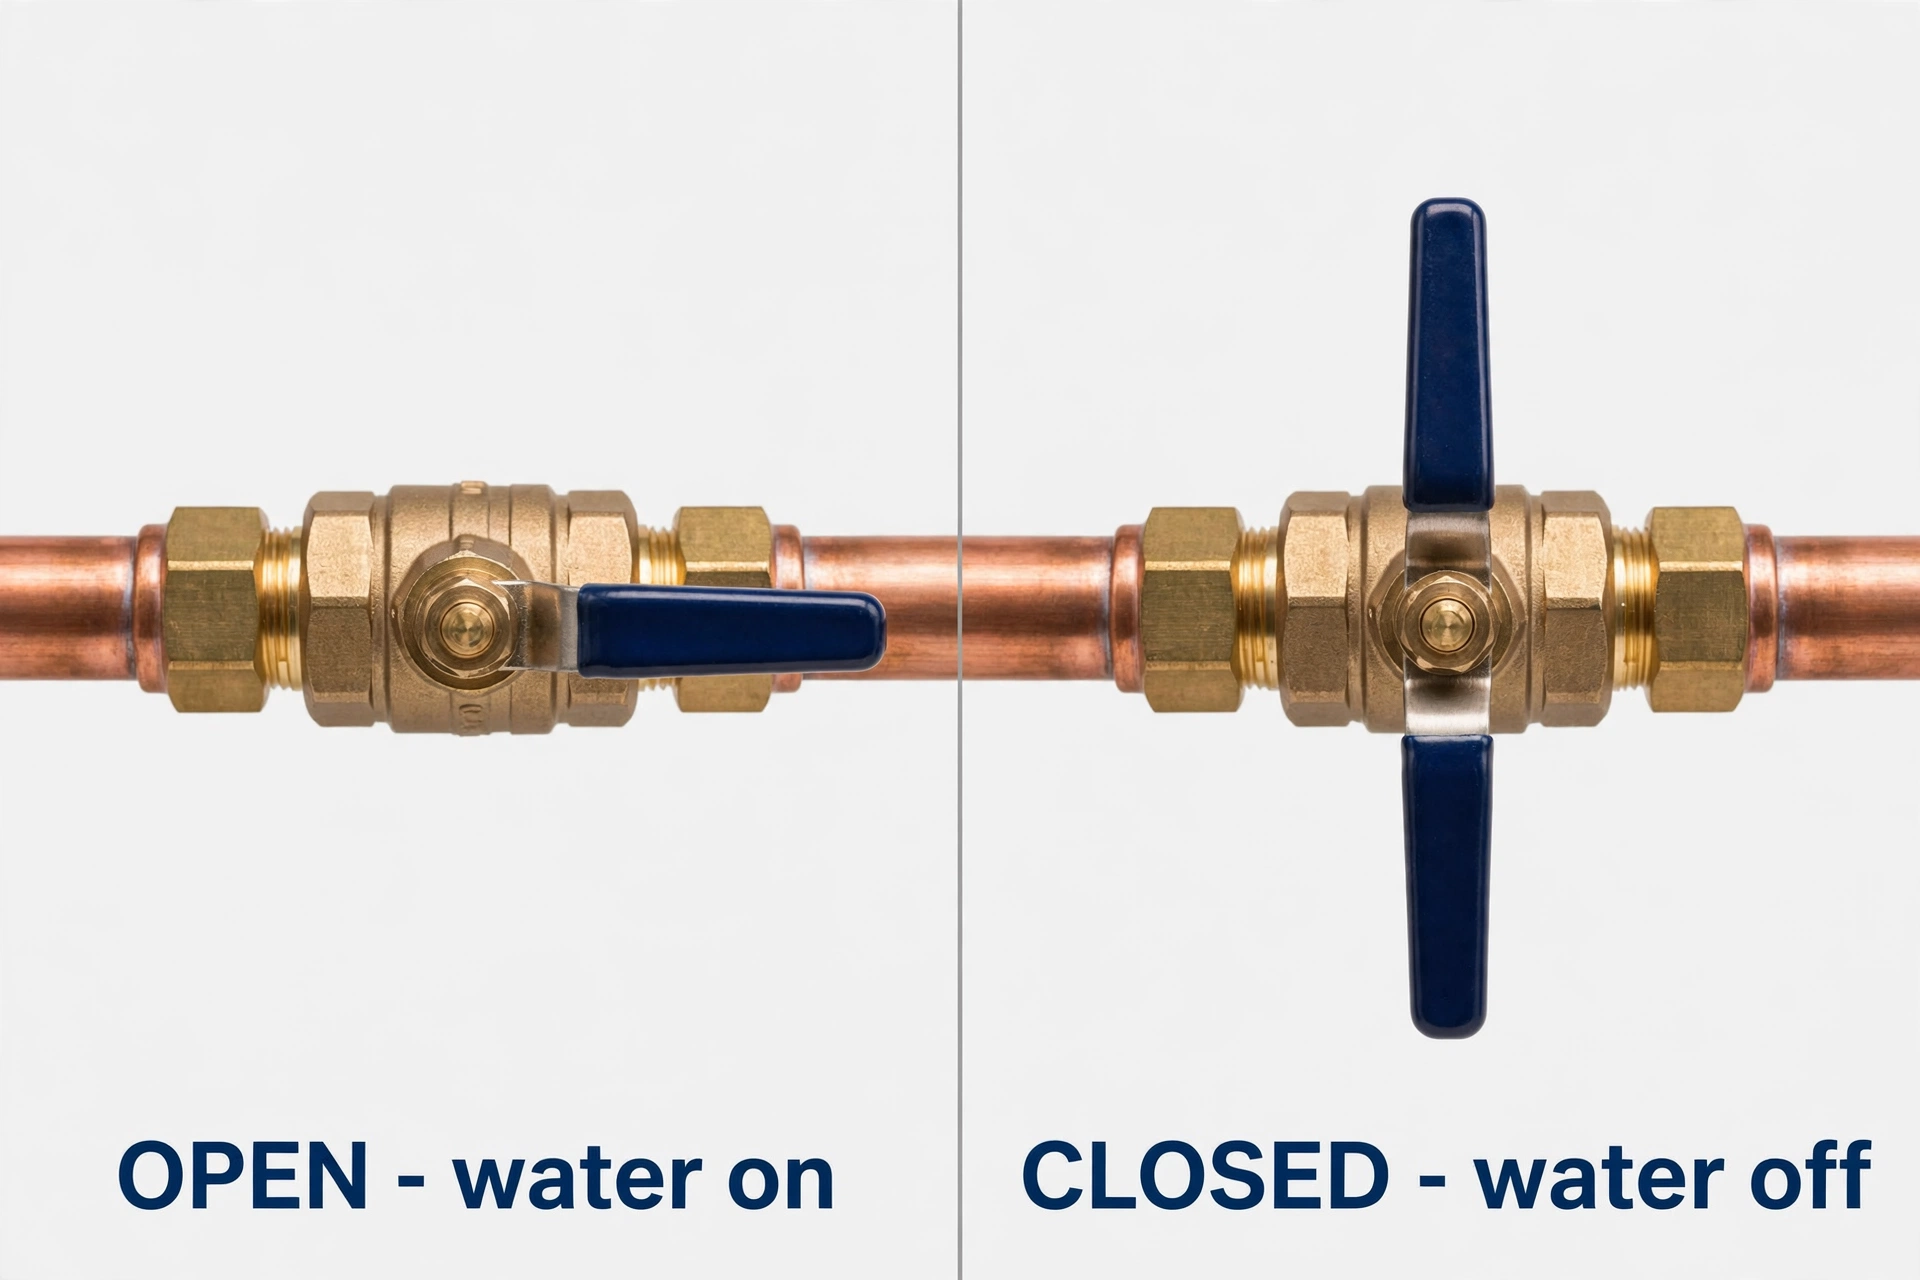
Ball valve — lever handle. Common in newer homes and the better choice for a main shutoff. A quarter-turn (90 degrees) fully opens or closes it: lever in line with the pipe = open, lever across (perpendicular to) the pipe = closed. Fast, positive, and far less likely to seize than a gate valve.
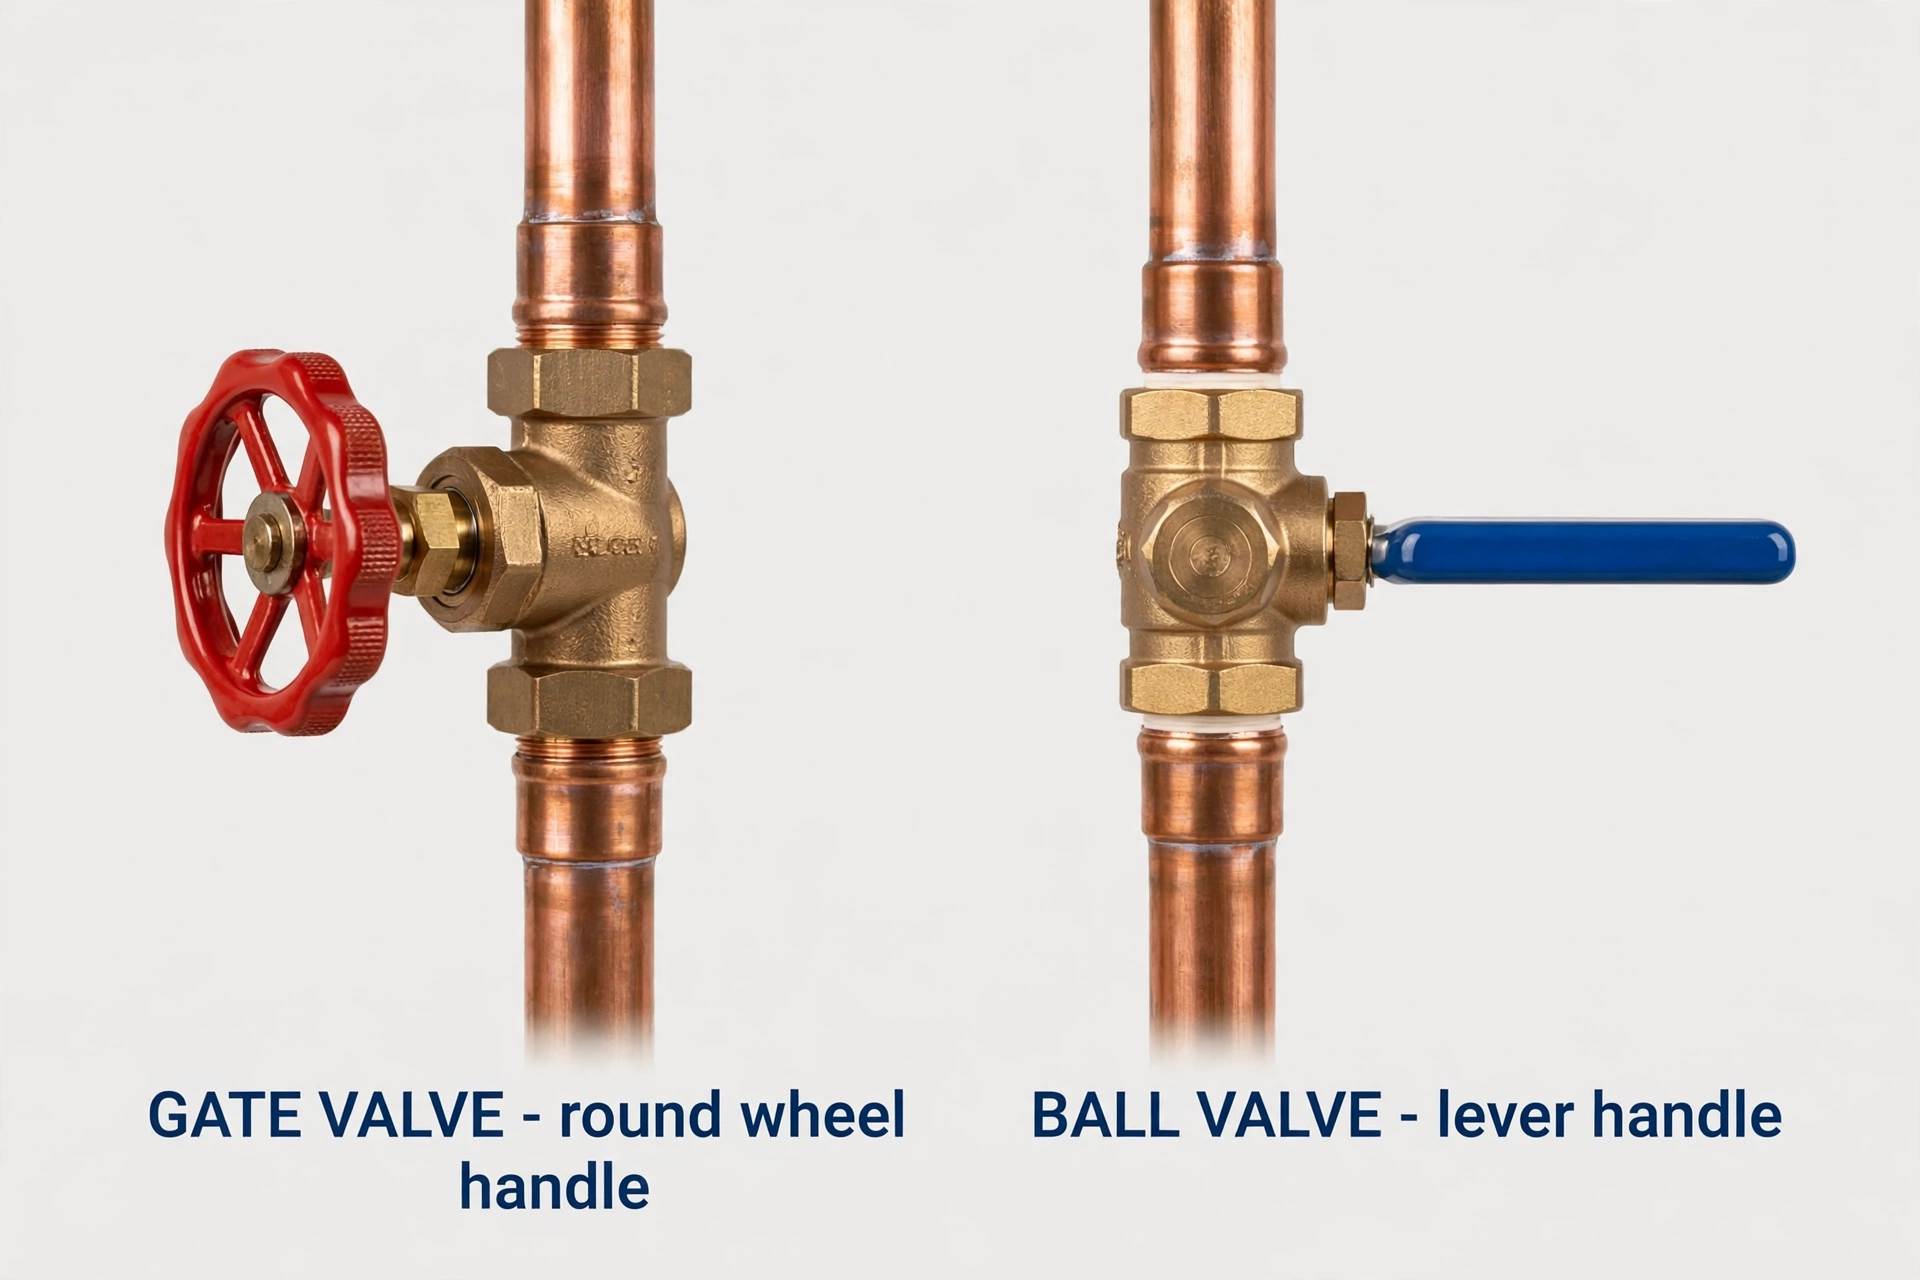
If your main shutoff is an old gate valve, pay special attention to the stuck-valve section below — these are the ones that cause trouble in emergencies.
Where the Main Shutoff Valve Is Usually Located
There is no single universal location — it depends on your home’s age, foundation type, climate, and water source. But it is always on the main line, close to where water enters the house. Work through these spots in order:
If you have a basement: check the wall facing the street, where the water line comes through the foundation. Look near the water heater or where the pipe first enters — the valve is usually within a few feet of that entry point. Bring a flashlight; these corners are often dark and crowded.
If you have a crawlspace: the valve is typically just inside the foundation wall where the line enters, sometimes low enough that you’ll need to crouch. In cold climates it will be inside (freeze protection), not outside.
Slab foundation, no basement: check the garage where the water line enters the wall or ceiling, the utility or laundry room, or near the water heater. In some slab homes the shutoff is in a small access panel in a closet or hallway wall.
Warm climates: the main shutoff is often outside — on an exterior wall where the line enters, or in a ground-level box near the foundation. Homes in freeze-prone regions keep it indoors for a reason; homes where freezing isn’t a concern often don’t.
Near the water meter: if the indoor search fails, find your water meter — usually in a concrete or plastic box flush with the ground near the street or sidewalk, sometimes with a lid marked “water” or “meter.” In many homes there is a homeowner-side shutoff valve in or near that box, on the house side of the meter (not the street side). Meter boxes can hold dirt, debris, and insects, so lift the lid carefully and use a light.
On well water? The setup differs: look near the pressure tank (often in a basement, crawlspace, utility room, or well house). Your system may also have a pump switch or a dedicated breaker — learn both, because cutting the pump stops new water from entering the system.
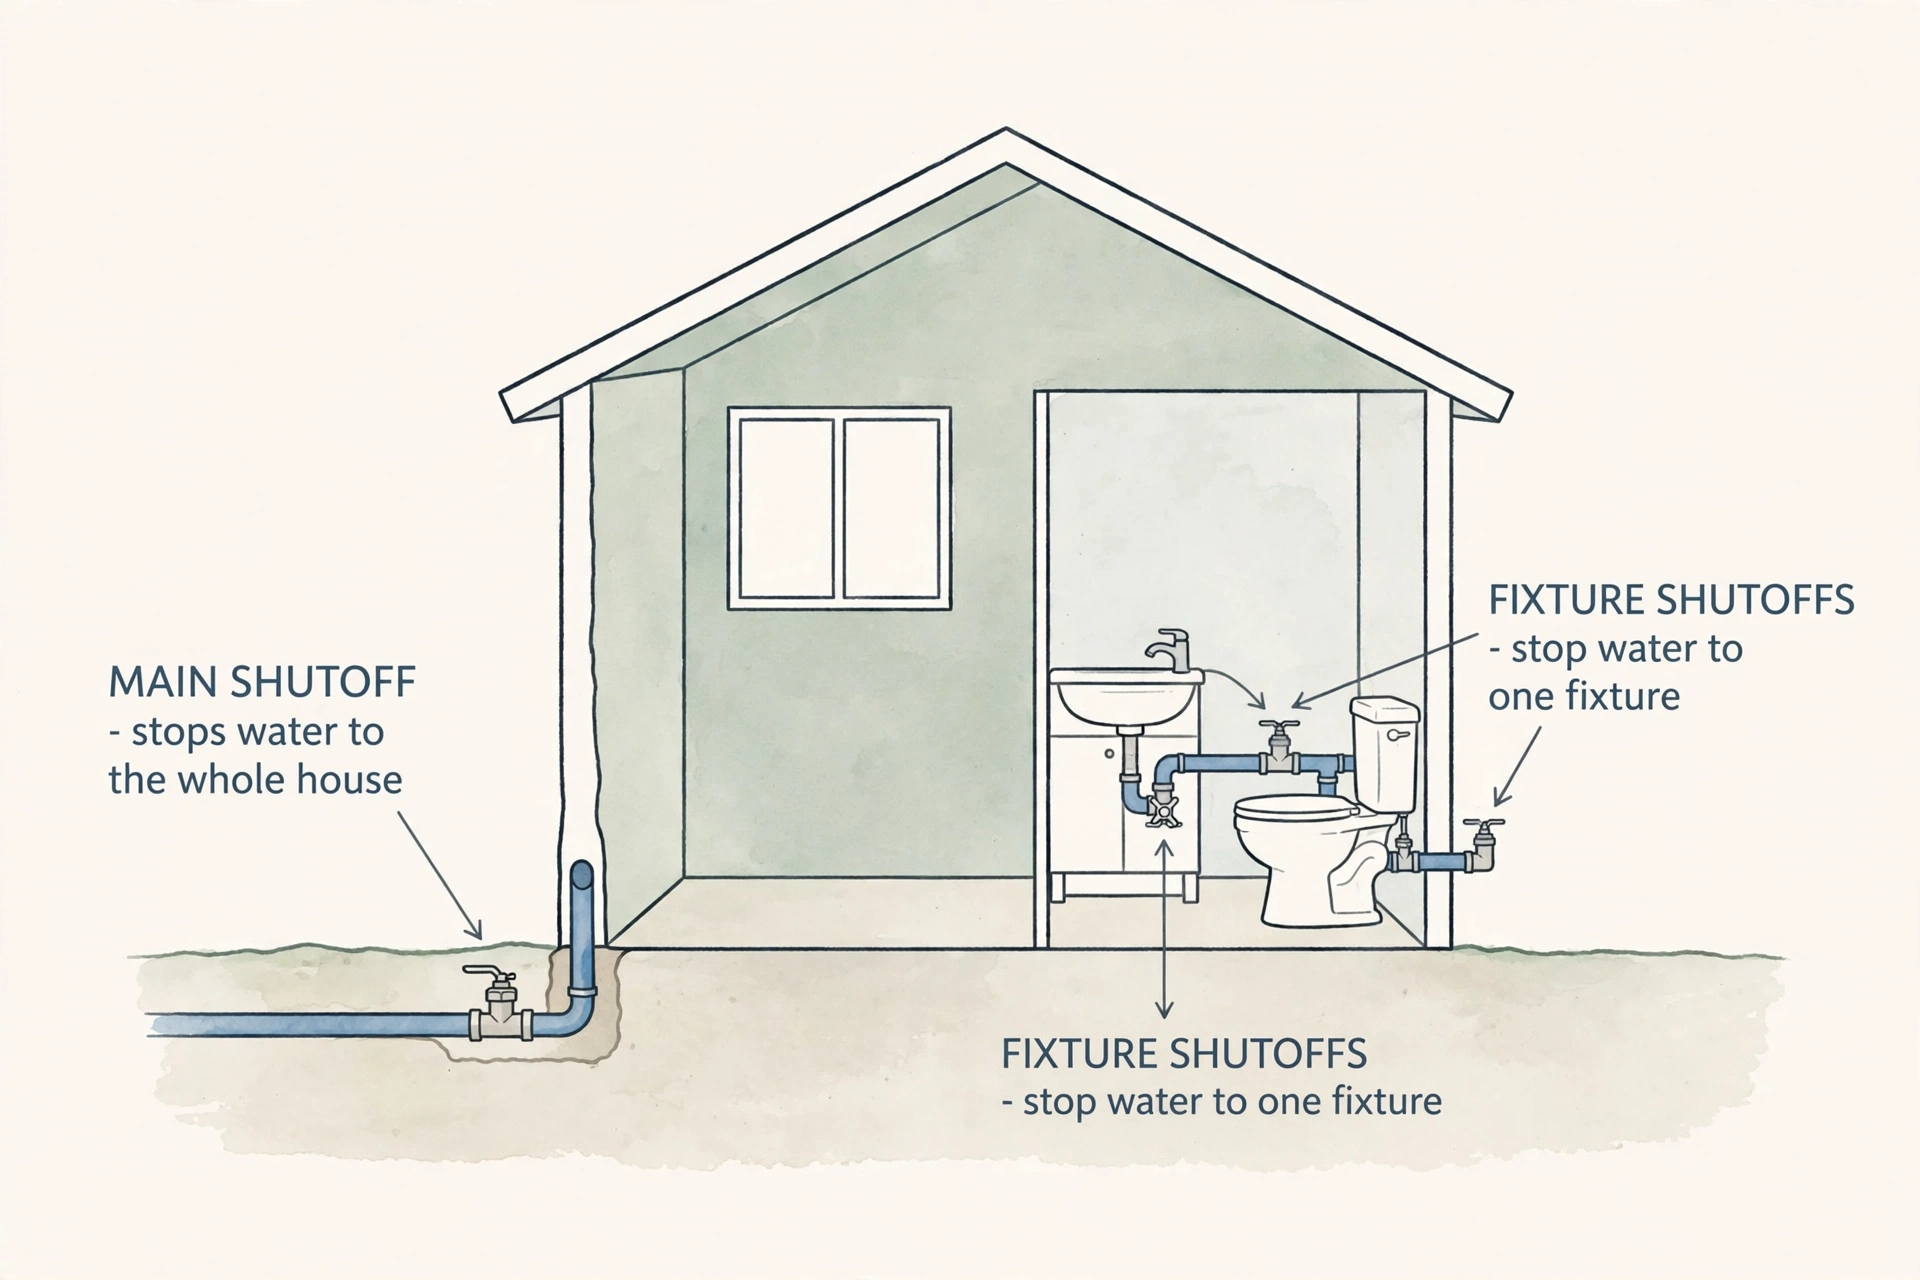
Where to Find Fixture and Appliance Shutoffs
These small valves let you isolate one fixture without touching the house main. Learn the ones in your home now, not during a leak:
- Toilets: a single valve on the wall or floor behind the bowl, near the base. Usually a small oval handle or lever. Turn clockwise to close. (If your toilet runs nonstop, shutting this valve first buys you time — our running-toilet diagnosis guide walks through what to check next.)
- Sinks: two small valves inside the cabinet under the sink — hot (usually left) and cold (usually right). Close both before any faucet repair; see our dripping kitchen faucet guide for what comes after the water is off, or faucet replacement if repair isn’t enough.
- Washing machine: two valves (hot and cold) on the wall directly behind the machine. These supply hoses are a common burst point — know where they are.
- Dishwasher: usually a single valve under the kitchen sink, on the hot-water line feeding the dishwasher.
- Water heater: a shutoff on the cold-water inlet pipe at the top of the tank. Note what this does not do: it stops new water entering the tank, but Shutting off the supply does not empty the tank; check its label for its capacity. You do not need to drain the tank for ordinary shutoffs.
- Refrigerator ice maker: a small dedicated valve, sometimes under the sink, behind the fridge, or in the basement below the kitchen. Older saddle-style (piercing) valves are failure-prone — if yours looks corroded, have a plumber replace it rather than forcing it.
- Outdoor hose bibs: many homes have an interior shutoff for each exterior faucet, often in the basement or crawlspace along the same wall. This is the valve you’ll use when winterizing an outdoor faucet.
How to Close Each Valve Type
Ball valve (lever): swing the lever 90 degrees until it is perpendicular to the pipe. It should move with firm, steady hand pressure. Do not extend it with a wrench or pipe for leverage — if a ball valve truly won’t move by hand, something is wrong and forcing it risks breaking the valve body.
Gate valve (round wheel): turn clockwise until it stops. Expect several full rotations. Use steady hand pressure only — never a cheater bar or excessive force on an old wheel. If it moves a little then binds, stop; a partially closed gate valve that you keep fighting is how stems snap.
Fixture valves: almost all close clockwise, like a standard faucet. Small oval handles can be stiff from disuse; moderate hand pressure is fine, tools are not.
How to Confirm the Water Is Actually Off
Closing a valve and verifying it closed are two different steps — especially with old gate valves, which can feel closed while still passing water.
- Open the lowest faucet in the house (often a basement laundry sink or an outdoor hose bib). Water should flow briefly, then slow to a stop as pressure bleeds off. That residual flow is normal — it’s just the water already in the pipes.
- Check the fixture you were worried about. A toilet tank should stop refilling; a leaking supply line should go quiet.
- If flow never fully stops, the valve isn’t sealing — it may be worn, partially seized, or not the main at all. Treat it as a failed shutoff: call a plumber rather than fighting it harder.
- Relieving pressure is part of the job. Leaving that lowest faucet open while you work keeps pressure off the repair area.
Note: turning the main off does not drain your pipes or your water heater — it just stops new water from entering. For most repairs, that’s exactly what you need.
Can’t Find the Main Shutoff? Try This Next
If you’ve checked every likely spot and still can’t find it, work outward:
- Check your home inspection report. Inspectors routinely note the main shutoff location — if you bought your home in recent years, the answer may be sitting in a PDF you already have.
- Trace the line. Find where water enters (follow the pipe from the water heater backward, or look at which foundation wall faces the street), then search methodically along that path, including inside closets and behind access panels.
- Ask the previous owner or builder, if that’s an option. Five minutes of asking beats an hour of searching.
- Call your water utility. They can often tell you the standard shutoff arrangement for homes in your area — and in an active emergency, many will send someone to shut off water at the meter for you.
- Apartments and condos: you may not have an individual main at all. The building’s main is controlled by management or maintenance — find out now who to call and how to reach them after hours.
The Valve Won’t Turn — What to Do
This is the most dangerous moment in the whole process — not because of the water, but because of what a frustrated person does to a stuck valve.
Do not force it. A seized gate valve forced with a wrench or cheater bar can snap its stem or start leaking at the packing — turning a controlled situation into an uncontrolled one. Moderate hand pressure is the limit. If it doesn’t move, it doesn’t move.
What you can safely try:
- Make sure you’re turning the right direction (clockwise to close for wheel handles; lever valves only travel 90 degrees — if the lever is already across the pipe, it’s closed).
- A tiny back-and-forth wiggle — a fraction of a turn each way — sometimes frees a mildly stuck valve. The moment it resists firmly, stop.
- Check whether you’re fighting the wrong valve. A valve on a branch line looks identical to a main; confirm by the location (main line, where water enters) and the faucet test.
When to stop and call a plumber:
- The valve won’t move with moderate hand pressure.
- It moves but water keeps flowing (worn internals — it will never seal).
- It starts dripping or spraying from the stem or body when you touch it. Leave it in whichever position minimizes flow and call a plumber; do not keep working it.
- The valve is visibly corroded, cracked, or damaged.
A plumber can free or replace a failed shutoff in one visit — and a working main shutoff is worth far more than the service call the next time a pipe bursts.
Meter Boxes and the Curb Stop: Know the Line
Your plumbing ends where the utility’s begins, and the meter box is where those two worlds meet. This matters because the curb-stop valve near the street is typically utility-owned equipment, not an ordinary homeowner control.
- Rules vary by utility and jurisdiction: some allow homeowners to operate the customer-side valve in the meter box (often with a meter key), others prohibit it or prefer you call them.
- Meter boxes can be unpleasant inside — dirt, standing water, insects — and the valves in them may need a long meter key to reach.
- Never treat the utility side as your backup plan without checking first. In an emergency, calling your water utility’s emergency line is always legitimate; operating their equipment without knowing the local rules is not.
- Many municipal utilities publish their own guidance on finding your shutoff — for example, the City of Tualatin, Oregon’s water meter and shutoff guide walks through meter-box and valve locations. Look up your own utility’s version; the specifics for your street are the ones that count.
If flooding is severe and no homeowner-side valve works, the utility can shut off water at the curb. That’s what their emergency line is for.
Do This Before an Emergency
Ten quiet minutes now prevents panic later:
- Locate every valve in this guide — the main, plus the fixture valves at each toilet, sink, and appliance. Actually put your hands on them.
- Label them. A luggage tag or a strip of tape marked “MAIN — turn clockwise” / “MAIN — lever across = off” removes all guesswork for anyone in the household.
- Operate the main once, gently. Confirm it moves and reseats. If it’s an old gate valve that hasn’t turned in years and it resists — don’t force it; put “have plumber service the main shutoff” on your to-do list instead of discovering the problem mid-flood.
- Teach everyone in the house old enough to follow the steps — especially the emergency path at the top of this article.
- Save two numbers in your phone: your plumber, and your water utility’s emergency line.
- Fold it into your routine. Add “confirm shutoff locations” to your new-homeowner maintenance checklist — it’s a five-minute item that belongs next to testing smoke detectors.
What This Guide Doesn’t Cover
Deliberately. Shutoff valves are a control point, not a repair trade:
- Replacing a failed valve — that’s a plumbing repair involving cutting pipe and soldering or pressing fittings. Different job, different guide.
- Finding and fixing the leak itself — once the water is off, head to our DIY plumbing repairs hub for the actual repair guides.
- Water meter repair or replacement — utility territory.
- Full leak diagnosis (is it the roof? condensation? a slab leak?) — beyond turning water off safely.
Knowing where this guide stops is part of using it well.
Frequently Asked Questions
Should I turn off the main valve or just the fixture valve?
Use the fixture valve whenever the problem is isolated to one toilet, sink, or appliance — it’s faster and the rest of the house keeps water. Use the main when the leak’s source is unclear, when multiple fixtures are affected, when a fixture valve is missing or stuck, or when you’re leaving home for an extended period.
Which way do I turn a water shutoff valve to close it?
For wheel-handled valves (gate valves and most fixture valves): clockwise, like tightening a jar lid. For lever-handled ball valves: swing the lever a quarter-turn until it sits perpendicular (across) the pipe. When in doubt, close it and run the faucet test — the water will tell you.
How can I tell if a valve is open or closed just by looking?
On a ball valve, the handle tells you: in line with the pipe means open, across the pipe means closed. On a gate valve (round wheel), you can’t tell by looking — close it clockwise and verify with the lowest-faucet test.
Can I shut off the water at the meter box myself?
It depends on your utility. The curb-stop valve near the street is typically utility-owned, and rules vary: some utilities allow homeowner operation of the customer-side valve, others want you to call them. When in doubt — especially in an emergency — call your water utility’s emergency line and let them do it.
What should I do if my main shutoff valve is stuck?
Don’t force it. Confirm you’re turning the right direction, try a gentle back-and-forth wiggle, and stop at the first sign of firm resistance. A valve that won’t move with moderate hand pressure, one that passes water when “closed,” or one that starts leaking when touched needs a plumber — not more force.
Do I need to turn off the water heater when I shut off the main?
For ordinary repairs, no — closing the main stops new water from entering, and that’s enough. You don’t need to drain the tank. If you’ll leave the water off for several days (a long trip, a major repair), check your water heater manufacturer’s guidance for extended no-water periods.

Mohammed Algaari is the founder and editor of DIYMendly, a practical home-repair resource focused on making common DIY problems easier to understand and solve. He oversees the site’s content strategy and editorial direction, with an emphasis on clear, well-researched, step-by-step guidance based on reliable sources.
Pingback: DIY Plumbing Repairs: A Beginner's Guide to Common Fixes
Pingback: Ceiling Water Stain: Is It an Old Stain or an Active Leak? How to Tell